AZ-400 : Microsoft Azure DevOps Solutions : Part 12
-
Note: This question is part of a series of questions that present the same scenario. Each question in the series contains a unique solution that might meet the stated goals. Some question sets might have more than one correct solution, while others might not have a correct solution.
After you answer a question in this section, you will NOT be able to return to it. As a result, these questions will not appear in the review screen.
You plan to create a release pipeline that will deploy Azure resources by using Azure Resource Manager templates. The release pipeline will create the following resources:
– Two resource groups
– Four Azure virtual machines in one resource group
– Two Azure SQL databases in other resource groupYou need to recommend a solution to deploy the resources.
Solution: Create a main template that will deploy the resources in one resource group and a nested template that will deploy the resources in the other resource group.
Does this meet the goal?
- Yes
- No
Explanation:
Use two linked templates, instead of the nested template. -
Note: This question is part of a series of questions that present the same scenario. Each question in the series contains a unique solution that might meet the stated goals. Some question sets might have more than one correct solution, while others might not have a correct solution.
After you answer a question in this section, you will NOT be able to return to it. As a result, these questions will not appear in the review screen.
You plan to create a release pipeline that will deploy Azure resources by using Azure Resource Manager templates. The release pipeline will create the following resources:
Two resource groups
Four Azure virtual machines in one resource group
Two Azure SQL databases in other resource groupYou need to recommend a solution to deploy the resources.
Solution: Create a main template that has two linked templates, each of which will deploy the resources in its respective group.
Does this meet the goal?
- Yes
- No
Explanation:
To deploy your solution, you can use either a single template or a main template with many related templates. The related template can be either a separate file that is linked to from the main template, or a template that is nested within the main template. -
DRAG DROP
You are building an application that has the following assets:
– Source code
– Logs from automated tests and builds
– Large and frequently updated binary assets
– A common library used by multiple applicationsWhere should you store each asset? To answer, drag the appropriate Azure services to the correct assets. Each service may be used once. You may need to drag the split bar between panes or scroll to view content.
NOTE: Each correct selection is worth one point.
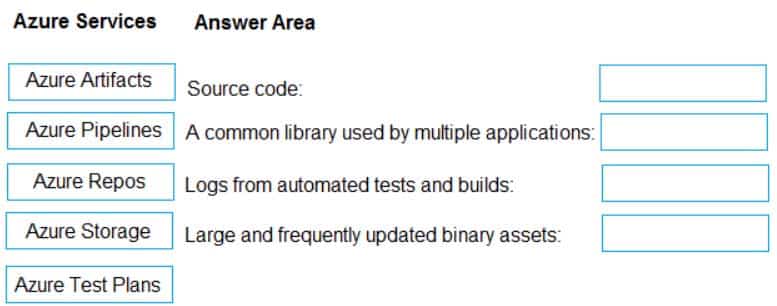
AZ-400 Microsoft Azure DevOps Solutions Part 12 Q03 111 Question 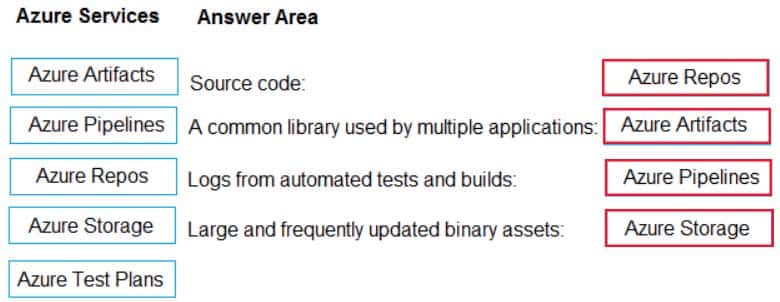
AZ-400 Microsoft Azure DevOps Solutions Part 12 Q03 111 Answer -
You plan to share packages that you wrote, tested, validated, and deployed by using Azure Artifacts.
You need to release multiple builds of each package by using a single feed. The solution must limit the release of packages that are in development.
What should you use?
- local symbols
- views
- global symbols
- upstream sources
Explanation:Upstream sources enable you to manage all of your product’s dependencies in a single feed. We recommend publishing all of the packages for a given product to that product’s feed, and managing that product’s dependencies from remote feeds in the same feed, via upstream sources. This setup has a few benefits:
– Simplicity: your NuGet.config, .npmrc, or settings.xml contains exactly one feed (your feed).
– Determinism: your feed resolves package requests in order, so rebuilding the same codebase at the same commit or changeset uses the same set of packages
– Provenance: your feed knows the provenance of packages it saved via upstream sources, so you can verify that you’re using the original package, not a custom or malicious copy published to your feed
– Peace of mind: packages used via upstream sources are guaranteed to be saved in the feed on first use; if the upstream source is disabled/removed, or the remote feed goes down or deletes a package you depend on, you can continue to develop and build -
You have a project in Azure DevOps named Project1. Project1 contains a build pipeline named Pipe1 that builds an application named App1.
You have an agent pool named Pool1 that contains a Windows Server 2019-based self-hosted agent. Pipe1 uses Pool1.
You plan to implement another project named Project2. Project2 will have a build pipeline named Pipe2 that builds an application named App2.
App1 and App2 have conflicting dependencies.
You need to minimize the possibility that the two build pipelines will conflict with each other. The solution must minimize infrastructure costs.
What should you do?
- Add another self-hosted agent.
- Add a Docker Compose task to the build pipelines.
- Change the self-hosted agent to use Red Hat Enterprise Linux (RHEL) 8.
- Create two container jobs.
Explanation:To get more control over software dependencies and operating system, you can use Container jobs. Note that the decisions whether to run your pipeline inside a container and whether to use a self-hosted agent are independent. You can directly run your pipeline on a self-hosted agent, or inside a container. You can also execute your pipeline in a container on a Microsoft-hosted agent or on a self-hosted agent.
Incorrect Answers:
A: For additional control over hardware, you can use a self-hosted build agent. -
SIMULATION
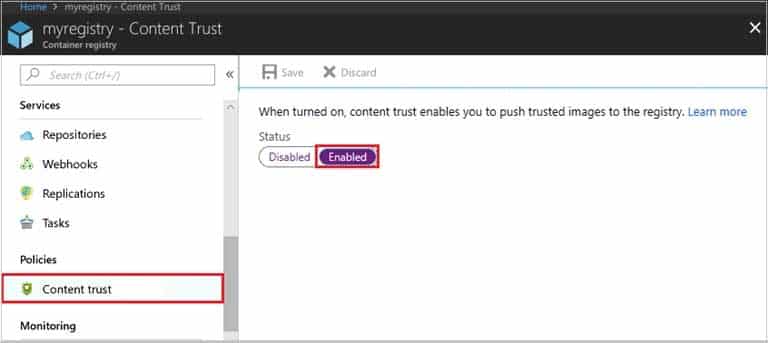
You plan to store signed images in an Azure Container Registry instance named az4009940427acr1.
You need to modify the SKU for az4009940427acr1 to support the planned images. The solution must minimize costs.
To complete this task, sign in to the Microsoft Azure portal.
- See explanation below.
-
You manage build pipelines and deployment pipelines by using Azure DevOps.
Your company has a team of 500 developers. New members are added continually to the team.
You need to automate the management of users and licenses whenever possible.
Which task must you perform manually?
- modifying group memberships
- adding users
- assigning entitlements
- procuring licenses
Explanation:Incorrect Answers:
A: You can seamlessly replace existing solutions with group-based licensing to more easily manage licenses in Azure DevOps. You can use Group rules.C: Member Entitlement Management APIs allow managing Entitlements that include –
– License
– Extensions
– Project/Team memberships -
HOTSPOT
Your company uses Team Foundation Server 2013 (TFS 2013).
You plan to migrate to Azure DevOps.
You need to recommend a migration strategy that meets the following requirements:
– Preserves the dates of Team Foundation Version Control changesets
– Preserves the changed dates of work items revisions
– Minimizes migration effort
– Migrates all TFS artifactsWhat should you recommend? To answer, select the appropriate options in the answer area.
NOTE: Each correct selection is worth one point.
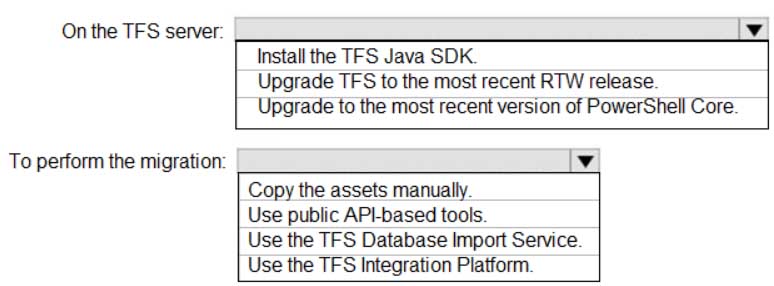
AZ-400 Microsoft Azure DevOps Solutions Part 12 Q08 113 Question 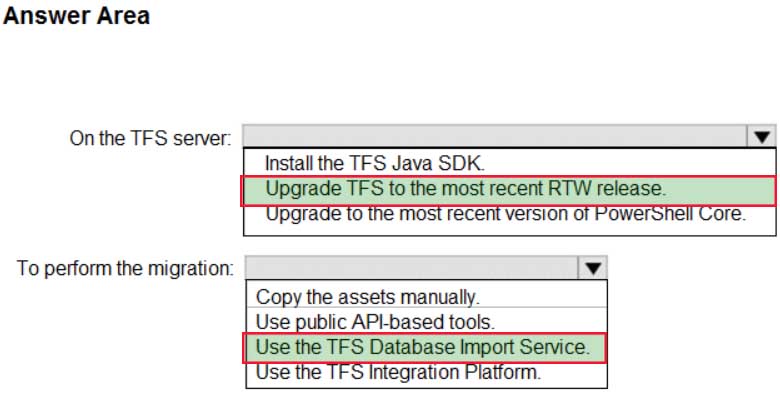
AZ-400 Microsoft Azure DevOps Solutions Part 12 Q08 113 Answer Explanation:Box 1: Upgrade TFS to the most recent RTM release.
One of the major prerequisites for migrating your Team Foundation Server database is to get your database schema version as close as possible to what is currently deployed in Azure Devops Services.Box 2: Use the TFS Database Import Service
In Phase 3 of your migration project, you will work on upgrading your Team Foundation Server to one of the supported versions for the Database Import Service in Azure Devops Services. -
Case Study
This is a case study. Case studies are not timed separately. You can use as much exam time as you would like to complete each case. However, there may be additional case studies and sections on this exam. You must manage your time to ensure that you are able to complete all questions included on this exam in the time provided.
To answer the questions included in a case study, you will need to reference information that is provided in the case study. Case studies might contain exhibits and other resources that provide more information about the scenario that is described in the case study. Each question is independent of the other questions in this case study.
At the end of this case study, a review screen will appear. This screen allows you to review your answers and to make changes before you move to the next section of the exam. After you begin a new section, you cannot return to this section.
To start the case study
To display the first question in this case study, click the Next button. Use the buttons in the left pane to explore the content of the case study before you answer the questions. Clicking these buttons displays information such as business requirements, existing environment, and problem statements. If the case study has an All Information tab, note that the information displayed is identical to the information displayed on the subsequent tabs. When you are ready to answer a question, click the Question button to return to the question.Overview
Contoso, Ltd. is a manufacturing company that has a main office in Chicago.Existing Environment
Contoso plans to improve its IT development and operations processes by implementing Azure DevOps principles. Contoso has an Azure subscription and creates an Azure DevOps organization.
The Azure DevOps organization includes:
– The Docker extension
– A deployment pool named Pool7 that contains 10 Azure virtual machines that run Windows Server 2019The Azure subscription contains an Azure Automation account.
Requirements
Planned changes
Contoso plans to create projects in Azure DevOps as shown in the following table.

AZ-400 Microsoft Azure DevOps Solutions Part 12 Q09 114 Technical requirements
Contoso identifies the following technical requirements:
– Implement build agents for Project1.
– Whenever possible, use Azure resources.
– Avoid using deprecated technologies.
– Implement a code flow strategy for Project2 that will:
– Enable Team2 to submit pull requests for Project2.
– Enable Team2 to work independently on changes to a copy of Project2.
– Ensure that any intermediary changes performed by Team2 on a copy of Project2 will be subject to the same restrictions as the ones defined in the build policy of Project2.
– Whenever possible, implement automation and minimize administrative effort.
– Implement Project3, Project5, Project6, and Project7 based on the planned changes.
– Implement Project4 and configure the project to push Docker images to Azure Container Registry.-
HOTSPOT
How should you configure the filters for the Project5 trigger? To answer, select the appropriate options in the answer area.
NOTE: Each correct selection is worth one point.
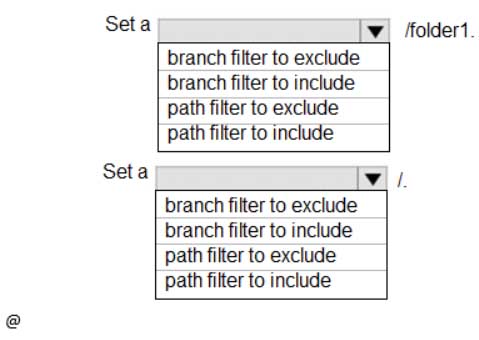
AZ-400 Microsoft Azure DevOps Solutions Part 12 Q09 115 Question 
AZ-400 Microsoft Azure DevOps Solutions Part 12 Q09 115 Answer Explanation:Box 1: branch filter to exclude
Scenario:
AZ-400 Microsoft Azure DevOps Solutions Part 12 Q09 116 Continuous integration (CI) triggers cause a build to run whenever a push is made to the specified branches or a specified tag is pushed.
Box 2: branch filter to include
You can specify branches to include and exclude. For example:
# specific branch build
trigger:
branches:
include:
– master
– releases/*
exclude:
– releases/old* -
In Azure DevOps, you create Project3.
You need to meet the requirements of the project.
What should you do first?
- From Azure DevOps, modify the build definition.
- From SonarQube, obtain an authentication token.
- From Azure DevOps, create a service endpoint.
- From SonarQube, create a project.
Explanation:
The first thing to do is to declare your SonarQube server as a service endpoint in your VSTS/DevOps project settings. -
You need to implement Project4.
What should you do first?
- Add the FROM instruction in the Dockerfile file.
- Add a Copy and Publish Build Artifacts task to the build pipeline.
- Add a Docker task to the build pipeline.
- Add the MAINTAINER instruction in the Dockerfile file.
Explanation:Scenario: Implement Project4 and configure the project to push Docker images to Azure Container Registry.

AZ-400 Microsoft Azure DevOps Solutions Part 12 Q09 117 You use Azure Container Registry Tasks commands to quickly build, push, and run a Docker container image natively within Azure, showing how to offload your “inner-loop” development cycle to the cloud. ACR Tasks is a suite of features within Azure Container Registry to help you manage and modify container images across the container lifecycle.
-
DRAG DROP
You need to recommend a procedure to implement the build agent for Project1.
Which three actions should you recommend be performed in sequence? To answer, move the appropriate actions from the list of actions to the answer area and arrange them in the correct order.
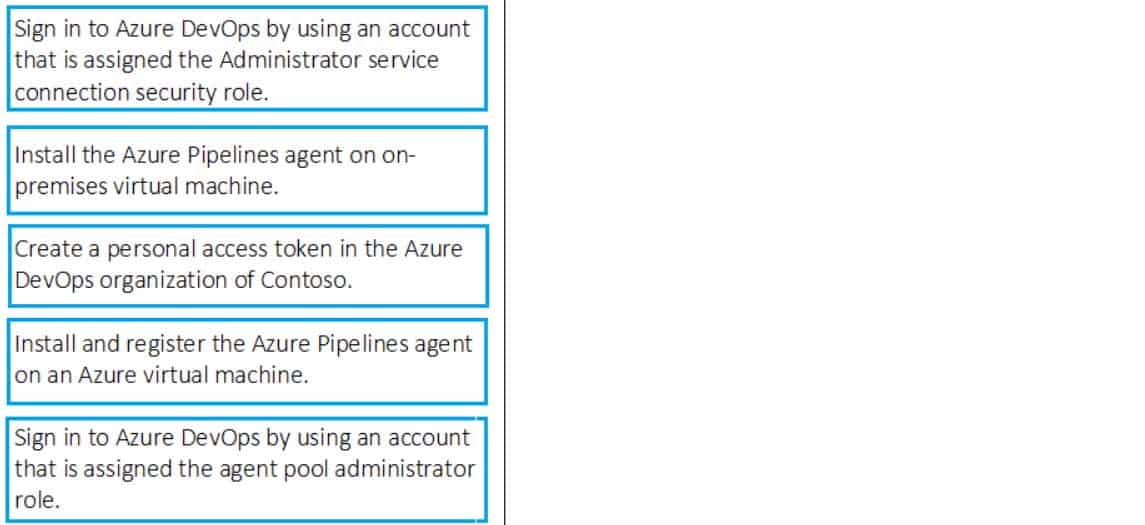
AZ-400 Microsoft Azure DevOps Solutions Part 12 Q09 118 Question 
AZ-400 Microsoft Azure DevOps Solutions Part 12 Q09 118 Answer Explanation:Scenario:

AZ-400 Microsoft Azure DevOps Solutions Part 12 Q09 119 Step 1: Sign in to Azure Devops by using an account that is assigned the Administrator service connection security role.
Note: Under Agent Phase, click Deploy Service Fabric Application. Click Docker Settings and then click Configure Docker settings. In Registry Credentials Source, select Azure Resource Manager Service Connection. Then select your Azure subscription.
Step 2: Create a personal access token..
A personal access token or PAT is required so that a machine can join the pool created with the Agent Pools (read, manage) scope.Step 3: Install and register the Azure Pipelines agent on an Azure virtual machine.
By running a Azure Pipeline agent in the cluster, we make it possible to test any service, regardless of type. -
DRAG DROP
You need to implement Project6.
Which three actions should you perform in sequence? To answer, move the appropriate actions from the list of actions to the answer area and arrange them in the correct order.

AZ-400 Microsoft Azure DevOps Solutions Part 12 Q09 120 Question 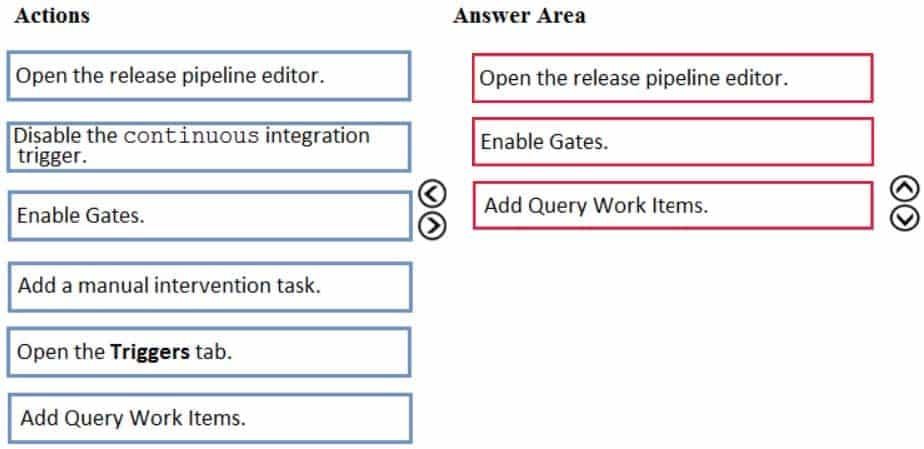
AZ-400 Microsoft Azure DevOps Solutions Part 12 Q09 120 Answer Explanation:Scenario: Implement Project3, Project5, Project6, and Project7 based on the planned changes

AZ-400 Microsoft Azure DevOps Solutions Part 12 Q09 121 Step 1: Open the release pipeline editor.
In the Releases tab of Azure Pipelines, select your release pipeline and choose Edit to open the pipeline editor.Step 2: Enable Gates.
Choose the pre-deployment conditions icon for the Production stage to open the conditions panel. Enable gates by using the switch control in the Gates section.Step 3: Add Query Work items.
Choose + Add and select the Query Work Items gate.
Configure the gate by selecting an existing work item query.
AZ-400 Microsoft Azure DevOps Solutions Part 12 Q09 122 Note: A case for release gate is:
Incident and issues management. Ensure the required status for work items, incidents, and issues. For example, ensure deployment occurs only if no priority zero bugs exist, and validation that there are no active incidents takes place after deployment.
-
-
Your company uses Azure Artifacts for package management.
You need to configure an upstream source in Azure Artifacts for Python packages.
Which repository type should you use as an upstream source?
- npmjs.org
- PyPI
- Maven Central
- third-party trusted Python
Explanation:Get started with Python packages in Azure Artifacts
Create a feed
1. Select Artifacts (in the left navigation of your Azure DevOps project).
2. On the Artifacts page, select Create Feed.
3. In the Create new feed dialog box:
4. In the Name field, give the feed a name.PyPI is the default repository name for twine, which is a tool for publishing Python packages.
-
HOTSPOT
You manage the Git repository for a large enterprise application.
You need to minimize the data size of the repository.
How should you complete the commands? To answer, select the appropriate options in the answer area.
NOTE: Each correct selection is worth one point.
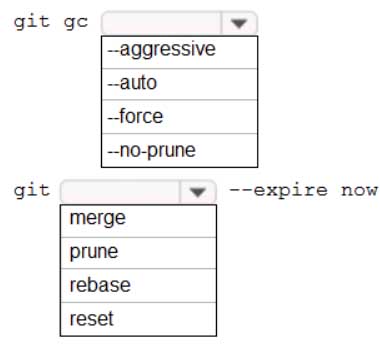
AZ-400 Microsoft Azure DevOps Solutions Part 12 Q11 123 Question 
AZ-400 Microsoft Azure DevOps Solutions Part 12 Q11 123 Answer Explanation:Box 1: –aggressive
Cleanup unnecessary files and optimize the local repository:git gc –aggressive
Box 2: prune
Prune all unreachable objects from the object database:
git prune -
SIMULATION
You plan to deploy a template named D:\Deploy.json to a resource group named Deploy-lod9940427.
You need to modify the template to meet the following requirements, and then to deploy the template:
– The address space must be reduced to support only 256 total IP addresses.
– The subnet address space must be reduced to support only 64 total IP addresses.To complete this task, sign in to the Microsoft Azure portal.
- See explanation below.
Explanation:1. Sign in to the portal.
2. Choose template Deploy-lod9940427
3. Select Edit template, and then paste your JSON template code into the code window.
4. Change the ASddressPrefixes to 10.0.0.0/24 in order to support only 256 total IP addresses.addressSpace”:{“addressPrefixes”: [“10.0.0.0/24”]},
5. Change the firstSubnet addressprefix to 10.0.0.0/26 to support only 64 total IP addresses.“subnets”:[
{
“name”:”firstSubnet”,
“properties”:{
“addressPrefix”:”10.0.0.0/24″
}
6. Select Save.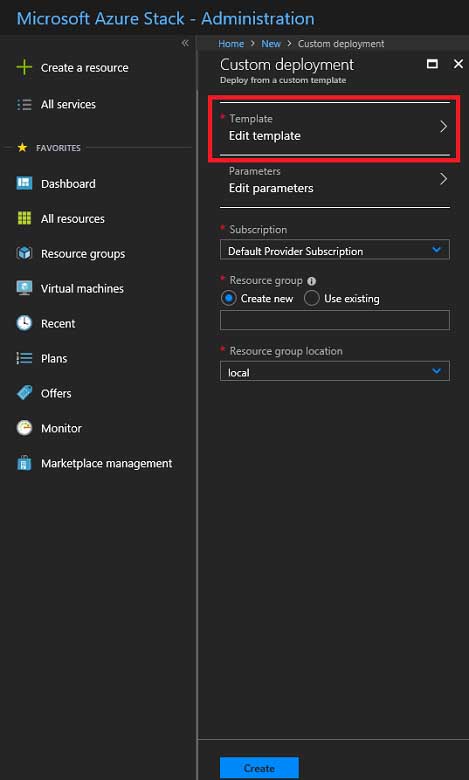
AZ-400 Microsoft Azure DevOps Solutions Part 12 Q12 124 7. Select Edit parameters, provide values for the parameters that are shown, and then select OK.
8. Select Subscription. Choose the subscription you want to use, and then select OK.
9. Select Resource group. Choose an existing resource group or create a new one, and then select OK.
AZ-400 Microsoft Azure DevOps Solutions Part 12 Q12 125 10. Select Create. A new tile on the dashboard tracks the progress of your template deployment.
-
SIMULATION
You need to configure an Azure web app named az400-9940427-main to contain an environmental variable named “MAX_ITEMS”. The environmental variable must have a value of 50.
To complete this task, sign in to the Microsoft Azure portal.
- See explanation below.
Explanation:1. In the Azure portal, navigate to the az400-9940427-main app’s management page. In the app’s left menu, click Configuration > Application settings.

AZ-400 Microsoft Azure DevOps Solutions Part 12 Q13 126 2. Click New Application settings
3. Enter the following:
– Name: MAX_ITEMS
– Value: 50 -
DRAG DROP
You provision an Azure Kubernetes Service (AKS) cluster that has RBAC enabled. You have a Helm chart for a client application.
You need to configure Helm and Tiller on the cluster and install the chart.
Which three commands should you recommend be run in sequence? To answer, move the appropriate commands from the list of commands to the answer area and arrange them in the correct order.
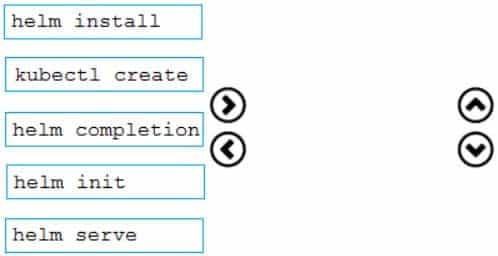
AZ-400 Microsoft Azure DevOps Solutions Part 12 Q14 127 Question 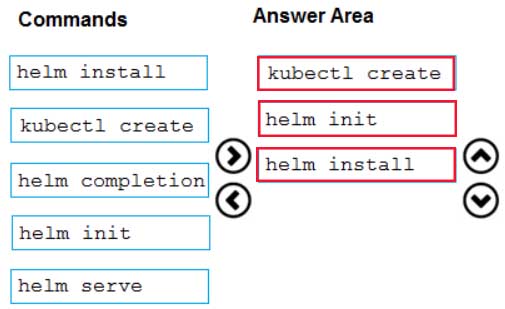
AZ-400 Microsoft Azure DevOps Solutions Part 12 Q14 127 Answer Explanation:Step 1: Kubectl create
You can add a service account to Tiller using the –service-account <NAME> flag while you’re configuring Helm (step 2 below). As a prerequisite, you’ll have to create a role binding which specifies a role and a service account name that have been set up in advance.
Example: Service account with cluster-admin role
$ kubectl create -f rbac-config.yaml
serviceaccount “tiller” created
clusterrolebinding “tiller” created
$ helm init –service-account tillerStep 2: helm init
To deploy a basic Tiller into an AKS cluster, use the helm init command.Step 3: helm install
To install charts with Helm, use the helm install command and specify the name of the chart to install. -
Your company builds a multi-tier web application.
You use Azure DevOps and host the production application on Azure virtual machines.
Your team prepares an Azure Resource Manager template of the virtual machine that you will use to test new features.
You need to create a staging environment in Azure that meets the following requirements:
– Minimizes the cost of Azure hosting
– Provisions the virtual machines automatically
– Uses the custom Azure Resource Manager template to provision the virtual machinesWhat should you do?
- In Azure Cloud Shell, run Azure CLI commands to create and delete the new virtual machines in a staging resource group.
- In Azure DevOps, configure new tasks in the release pipeline to deploy to Azure Cloud Services.
- From Azure Cloud Shell, run Azure PowerShell commands to create and delete the new virtual machines in a staging resource group.
- In Azure DevOps, configure new tasks in the release pipeline to create and delete the virtual machines in Azure DevTest Labs.
Explanation:You can use the Azure DevTest Labs Tasks extension that’s installed in Azure DevOps to easily integrate your CI/CD build-and-release pipeline with Azure DevTest Labs. The extension installs three tasks:
– Create a VM
– Create a custom image from a VM
– Delete a VMThe process makes it easy to, for example, quickly deploy a “golden image” for a specific test task and then delete it when the test is finished.
-
DRAG DROP
You are implementing an Azure DevOps strategy for mobile devices using App Center.
You plan to use distribution groups to control access to releases.
You need to create the distribution groups shown in the following table.

AZ-400 Microsoft Azure DevOps Solutions Part 12 Q16 128 Which type of distribution group should you use for each group? To answer, drag the appropriate group types to the correct locations. Each group type may be used once, more than once, or not at all. You may need to drag the split bar between panes or scroll to view content.
NOTE: Each correct selection is worth one point.
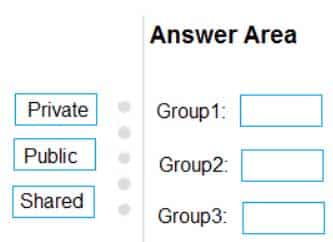
AZ-400 Microsoft Azure DevOps Solutions Part 12 Q16 129 Question 
AZ-400 Microsoft Azure DevOps Solutions Part 12 Q16 129 Answer Explanation:Box1: Private
In App Center, distribution groups are private by default. Only testers invited via email can access the releases available to this group.Box 2: Public
Distribution groups must be public to enable unauthenticated installs from public links.Box 3: Shared
Shared distribution groups are private or public distribution groups that are shared across multiple apps in a single organization. -
SIMULATION
You need to ensure that the https://contoso.com/statushook webhook is called every time a repository named az40010480345acr1 receives a new version of an image named dotnetapp.
To complete this task, sign in to the Microsoft Azure portal.
- See explanation below.
Explanation:1. Sign in to the Azure portal.
2. Navigate to the container registry az40010480345acr1.
3. Under Services, select Webhooks.
4. Select the existing webhook https://contoso.com/statushook, and double-click on it to get its properties.
5. For Trigger actions select image pushExample web hook:
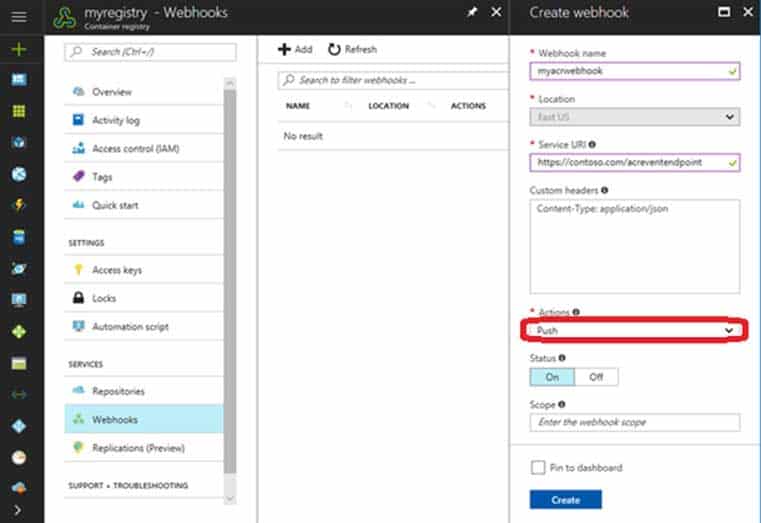
AZ-400 Microsoft Azure DevOps Solutions Part 12 Q17 130 -
HOTSPOT
You need to create deployment files for an Azure Kubernetes Service (AKS) cluster. The deployments must meet the provisioning storage requirements shown in the following table.

AZ-400 Microsoft Azure DevOps Solutions Part 12 Q18 131 Which resource type should you use for each deployment? To answer, select the appropriate options in the answer area.
NOTE: Each correct selection is worth one point.

AZ-400 Microsoft Azure DevOps Solutions Part 12 Q18 132 Question 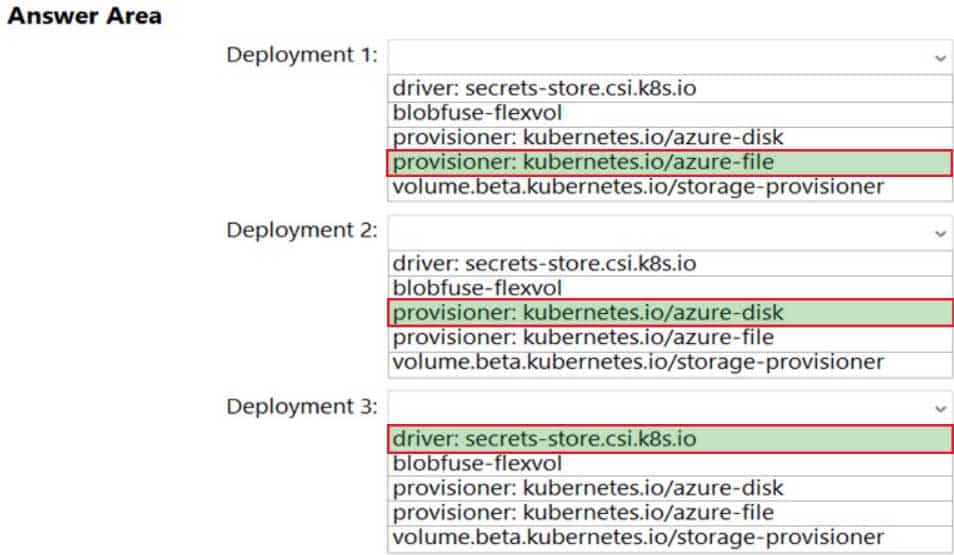
AZ-400 Microsoft Azure DevOps Solutions Part 12 Q18 132 Answer Explanation:Deployment 1: provisioner: kubernetes.io/azure-file
You can use Azure Files to connect using the Server Message Block (SMB) protocol.Deployment 2: provisioner: kubernetes.io/azure-disk
Deployment 3: driver: secrets-store.csi.k8s.io
Azure Key vault provider for Secrets Store CSI driver allows you to access secrets stored in an Azure Key vault instance. The Secrets Store CSI driver secrets-store.csi.k8s.io allows the cluster to mount secrets stored in Azure Key vault into the pods as a volume.Incorrect Answers:
blobfuse-flexvolume: This driver allows Kubernetes to access virtual filesystem backed by the Azure Blob storage.Note: azurekeyvault-flexvolume has been deprecated and replaced by the Azure Key Vault Provider for Secret Store CSI Driver.
-
Your company uses Azure DevOps to manage the build and release processes for applications.
You use a Git repository for applications source control.
You plan to create a new branch from an existing pull request. Later, you plan to merge the new branch and the target branch of the pull request.
You need to use a pull request action to create the new branch. The solution must ensure that the branch uses only a portion of the code in the pull request.
Which pull request action should you use?
- Set as default branch
- Approve with suggestions
- Cherry-pick
- Reactivate
- Revert
Explanation:
Cherry-pick a pull request
To copy changes made in a pull request to another branch in your repo, follow these steps:
1. In a completed pull request, select Cherry-pick, or for an active pull request, select Cherry-pick from the … menu. Cherry-picking a pull request in this way creates a new branch with the copied changes. Merge into a target branch in a second pull request.
2. In Target branch, enter the branch you want to merge the copied changes.
3. In Topic branch name, enter a new branch to contain the copied changes, then select Cherry-pick.
Select Create pull request to merge the topic branch into the target branch to complete the cherry-pick. -
DRAG DROP
You manage the Git repository for a large enterprise application.
During the development of the application, you use a file named Config.json.
You need to prevent Config.json from being committed to the source control whenever changes to the application are committed.
Which three actions should you perform in sequence? To answer, move the appropriate actions from the list of actions to the answer area and arrange them in the correct order.

AZ-400 Microsoft Azure DevOps Solutions Part 12 Q20 133 Question 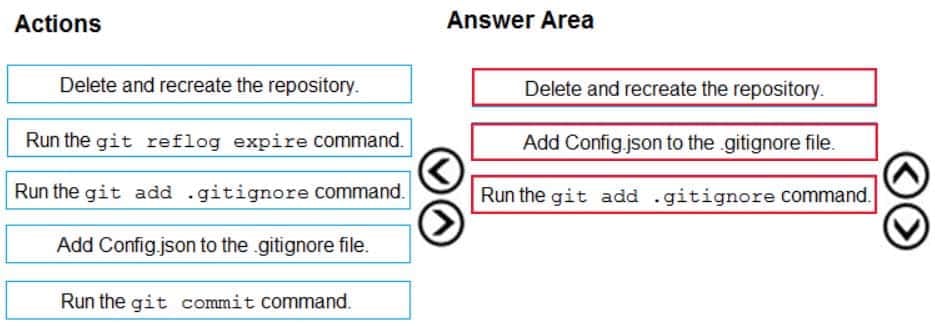
AZ-400 Microsoft Azure DevOps Solutions Part 12 Q20 133 Answer Explanation:Step 1: Delete and recreate the repository.
Step 2: Add Config.json to the .gitignore file
Each line in the .gitignore excludes a file or set of files that match a pattern.
Example:
# ignore a single file
Config.jsonStep 3: Run the git add .gitignore command
At the initial commit we want basically move from Untracked to Staged, for staging we have to indicate which file we want to move or specify a pattern, as example:
