MS-100 : Microsoft 365 Identity and Services : Part 09
MS-100 : Microsoft 365 Identity and Services : Part 09
-
HOTSPOT
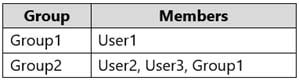
Your network contains an Active Directory domain named fabrikam.com. The domain contains the objects shown in the following table.

MS-100 Microsoft 365 Identity and Services Part 09 Q01 100 The groups have the members shown in the following table.
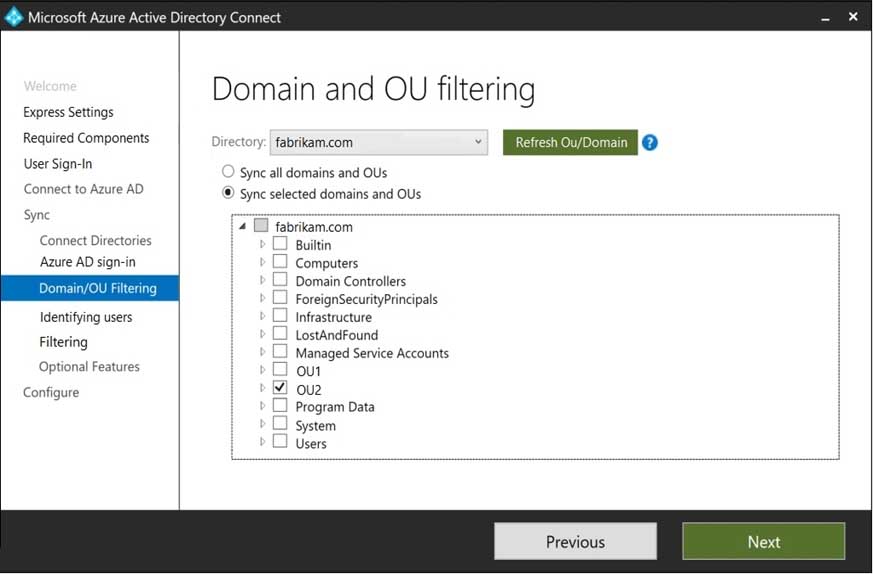
MS-100 Microsoft 365 Identity and Services Part 09 Q01 101 You are configuring synchronization between fabrikam.com and a Microsoft Azure Active Directory (Azure AD) tenant.
You configure the Domain/OU Filtering settings in Azure AD Connect as shown in the Domain/OU Filtering exhibit.
MS-100 Microsoft 365 Identity and Services Part 09 Q01 102 You configure the Filtering settings in Azure AD Connect as shown in the Filtering exhibit.

MS-100 Microsoft 365 Identity and Services Part 09 Q01 103 For each of the following statements, select Yes if the statement is true. Otherwise, select No.
NOTE: Each correct selection is worth one point.
MS-100 Microsoft 365 Identity and Services Part 09 Q01 104 Question 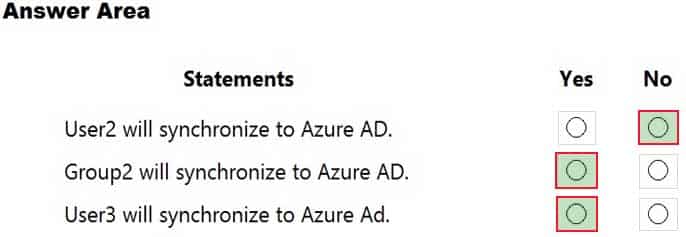
MS-100 Microsoft 365 Identity and Services Part 09 Q01 104 Answer Explanation:Box 1: No
The filtering is configured to synchronize Group2 and OU2 only. The effect of this is that only members of Group2 who are in OU2 will be synchronized.
User2 is in Group2. However, the User2 account object is in OU1 so User2 will not synchronize to Azure AD.Box 2: Yes
Group2 is in OU2 so Group2 will synchronize to Azure AD. However, only members of the group who are in OU2 will synchronize. Members of Group2 who are in OU1 will not synchronize.Box 3: Yes
User3 is in Group2 and in OU2. Therefore, User3 will synchronize to Azure AD. -
HOTSPOT
Your network contains an on-premises Active Directory forest named contoso.com. The forest contains the users shown in the following table.

MS-100 Microsoft 365 Identity and Services Part 09 Q02 105 You create an Azure Active Directory (Azure AD) tenant named fabrikam.onmicrosoft.com.
You plan to sync the users in the forest to fabrikam.onmicrosoft.com by using Azure AD Connect.
Which username will be assigned to User1 and User2 in Azure AD after the synchronization? To answer, select the appropriate options in the answer area.
NOTE: Each correct selection is worth one point.

MS-100 Microsoft 365 Identity and Services Part 09 Q02 106 Question 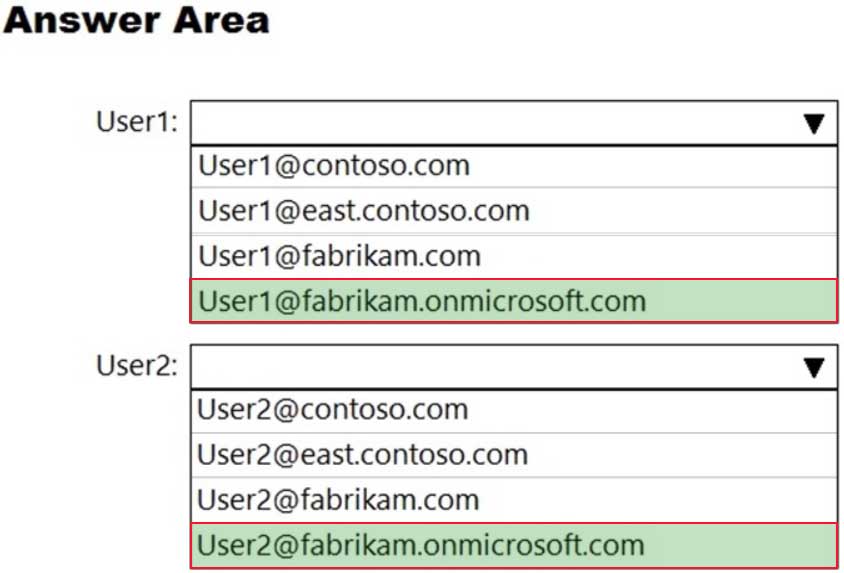
MS-100 Microsoft 365 Identity and Services Part 09 Q02 106 Answer Explanation:If you added the contoso.com and east.contoso.com domains as custom domains in Microsoft 365, then the users would be assigned their user principle names as Microsoft 365 usernames.
However, the question does not state that you have added the domains as custom domains. Therefore, both users will use the default @fabrikam.onmicrosoft.com domain for their usernames.
-
Your network contains an Active Directory domain named adatum.com that is synced to Microsoft Azure Active Directory (Azure AD).
The domain contains 100 user accounts.
The city attribute for all the users is set to the city where the user resides.
You need to modify the value of the city attribute to the three-letter airport code of each city.
What should you do?
- From Active Directory Administrative Center, select the Active Directory users, and then modify the Properties settings.
- From the Microsoft 365 admin center, select the users, and then use the Bulk actions option.
- From Azure Cloud Shell, run the Get-MsolUser and Set-MSOluser cmdlets.
- From Windows PowerShell on a domain controller, run the Get-AzureADUser and Set-AzureADUser cmdlets.
Explanation:The user accounts are synced from the on-premise Active Directory to the Microsoft Azure Active Directory (Azure AD). Therefore, the city attribute must be changed in the on-premise Active Directory.
You can modify certain attributes of multiple user accounts simultaneously by selecting them in Active Directory Administrative Center or Active Directory Users and Computers, right clicking then selecting Properties.
The other three options all suggest modifying the city attribute of the users in the Azure Active Directory which is incorrect.Note:
There are several versions of this question in the exam. The question has two possible correct answers:
1. From Windows PowerShell on a domain controller, run the Get-ADUser and Set-ADUser cmdlets.
2. From Active Directory Administrative Center, select the Active Directory users, and then modify the Properties settings.Other incorrect answer options you may see on the exam include the following:
1. From the Azure portal, select all the Azure AD users, and then use the User settings blade.
2. From Windows PowerShell on a domain controller, run the Get-AzureADUser and Set-AzureADUser cmdlets.
3. From the Microsoft 365 admin center, select the users, and then use the Bulk actions option. -
Your company has 10,000 users who access all applications from an on-premises data center.
You plan to create a Microsoft 365 subscription and to migrate data to the cloud.
You plan to implement directory synchronization.
User accounts and group accounts must sync to Microsoft Azure Active Directory (Azure AD) successfully.
You discover that several user accounts fail to sync to Azure AD.
You need to resolve the issue as quickly as possible.
What should you do?
- From Active Directory Administrative Center, search for all the users, and then modify the properties of the user accounts.
- Run idfix.exe, and then click Complete.
- From Windows PowerShell, run the Start-AdSyncCycle –PolicyType Delta command.
- Run idfix.exe, and then click Edit.
Explanation:
IdFix is used to perform discovery and remediation of identity objects and their attributes in an on-premises Active Directory environment in preparation for migration to Azure Active Directory. IdFix is intended for the Active Directory administrators responsible for directory synchronization with Azure Active Directory. -
Your network contains an Active Directory forest. The forest contains two domains named contoso.com and adatum.com.
Your company recently purchased a Microsoft 365 subscription.
You deploy a federated identity solution to the environment.
You use the following command to configure contoso.com for federation.
Convert-MsolDomaintoFederated –DomainName contoso.com
In the Microsoft 365 tenant, an administrator adds and verifies the adatum.com domain name.
You need to configure the adatum.com Active Directory domain for federated authentication.
Which two actions should you perform before you run the Azure AD Connect wizard? Each correct answer presents part of the solution.
NOTE: Each correct selection is worth one point.
- From Windows PowerShell, run the Convert-MsolDomaintoFederated
–DomainName contoso.com –SupportMultipleDomain command. - From Windows PowerShell, run the New-MsolFederatedDomain
–SupportMultipleDomain -DomainName contoso.com command. - From Windows PowerShell, run the New-MsolFederatedDomain
-DomainName adatum.com command. - From Windows PowerShell, run the Update-MSOLFederatedDomain
–DomainName contoso.com –SupportMultipleDomain command. - From the federation server, remove the Microsoft Office 365 relying party trust.
Explanation:
When the Convert-MsolDomaintoFederated –DomainName contoso.com command was run, a relying party trust was created.
Adding a second domain (adatum.com in this case) will only work if the SupportMultipleDomain switch was used when the initial federation was configured by running the Convert-MsolDomaintoFederated –DomainName contoso.com command.
Therefore, we need to start again by removing the relying party trust then running the Convert-MsolDomaintoFederated command again with the SupportMultipleDomain switch. - From Windows PowerShell, run the Convert-MsolDomaintoFederated
-
You have a Microsoft 365 subscription that contains a Microsoft Azure Active Directory (Azure AD) tenant named contoso.com. The tenant includes a user named User1.
You enable Azure AD Identity Protection.
You need to ensure that User1 can review the list in Azure AD Identity Protection of users flagged for risk. The solution must use the principle of least privilege.
To which role should you add User1?
- Compliance administrator
- Global administrator
- Owner
- Security administrator
Explanation:Either one of the following three roles can review the list in Azure AD Identity Protection of users flagged for risk:
– Security Administrator
– Global Administrator
– Security ReaderUsing the principle of least privilege, we should add User1 to the Security Administrator role.
Note:
There are several versions of this question in the exam. The question has three possible correct answers:
1. Security Reader
2. Security Administrator
Global AdministratorOther incorrect answer options you may see on the exam include the following:
1. Service Administrator.
2. Reports Reader
3. User Administrator -
SIMULATION
Please wait while the virtual machine loads. Once loaded, you may proceed to the lab section. This may take a few minutes, and the wait time will not be deducted from your overall test time.
When the Next button is available, click it to access the lab section. In this section, you will perform a set of tasks in a live environment. While most functionality will be available to you as it would be in a live environment, some functionality (e.g., copy and paste, ability to navigate to external websites) will not be possible by design.
Scoring is based on the outcome of performing the tasks stated in the lab. In other words, it doesn’t matter how you accomplish the task, if you successfully perform it, you will earn credit for that task.
Labs are not timed separately, and this exam may have more than one lab that you must complete. You can use as much time as you would like to complete each lab. But, you should manage your time appropriately to ensure that you are able to complete the lab(s) and all other sections of the exam in the time provided.
Please note that once you submit your work by clicking the Next button within a lab, you will NOT be able to return to the lab.
You may now click next to proceed to the lab.
Lab information
Use the following login credentials as needed:
To enter your username, place your cursor in the Sign in box and click on the username below.
To enter your password, place your cursor in the Enter password box and click on the password below.
Microsoft 365 Username:
admin@LODSe426243.onmicrosoft.comMicrosoft 365 Password: 3&YWyjse-6-d
If the Microsoft 365 portal does not load successfully in the browser, press CTRL-K to reload the portal in a new browser tab.
The following information is for technical support purposes only:
Lab Instance: 10887751
You need to modify Christie Cline to meet the following requirements:
– Christie Cline must be able to view the service dashboard and the Microsoft Office 365 Message center.
– Christie Cline must be able to create Microsoft support requests.
– The solution must use the principle of least privilege.- See explanation below.
Explanation:You need to assign Christie the ‘Service Support Admin’ role.
1. In the Microsoft 365 Admin Center, click ‘Roles’.
2. Scroll down to the Service Support Admin role and click on the role name.
3. Click the ‘Assigned Admins’ link.
4. Click the ‘Add’ button.
5. Start typing the name Christie then select her account when it appears.
6. Click Save. -
SIMULATION
Please wait while the virtual machine loads. Once loaded, you may proceed to the lab section. This may take a few minutes, and the wait time will not be deducted from your overall test time.
When the Next button is available, click it to access the lab section. In this section, you will perform a set of tasks in a live environment. While most functionality will be available to you as it would be in a live environment, some functionality (e.g., copy and paste, ability to navigate to external websites) will not be possible by design.
Scoring is based on the outcome of performing the tasks stated in the lab. In other words, it doesn’t matter how you accomplish the task, if you successfully perform it, you will earn credit for that task.
Labs are not timed separately, and this exam may have more than one lab that you must complete. You can use as much time as you would like to complete each lab. But, you should manage your time appropriately to ensure that you are able to complete the lab(s) and all other sections of the exam in the time provided.
Please note that once you submit your work by clicking the Next button within a lab, you will NOT be able to return to the lab.
You may now click next to proceed to the lab.
Lab information
Use the following login credentials as needed:
To enter your username, place your cursor in the Sign in box and click on the username below.
To enter your password, place your cursor in the Enter password box and click on the password below.
Microsoft 365 Username:
admin@LODSe426243.onmicrosoft.comMicrosoft 365 Password: 3&YWyjse-6-d
If the Microsoft 365 portal does not load successfully in the browser, press CTRL-K to reload the portal in a new browser tab.
The following information is for technical support purposes only:
Lab Instance: 10887751
Your organization has an office in Seattle.
You plan to create 100 users who will work in the Seattle office. The city attribute for all the users will be Seattle.
You need to create a group named Group1 that will automatically contain all the Seattle office users.
- See explanation below.
Explanation:You need to create a Dynamic group. User accounts with the city attribute set to ‘Seattle’ will automatically be added to the group.
1. Go to the Azure Active Directory admin center.
2. Select Azure Active Directory then select Groups.
3. Click on the New Group link.
4. Give the group a name such as Seattle Users.
5. Select Users as the membership type.
6. Select ‘Add dynamic query’.
7. Select ‘City’ in the Property drop-down box.
8. Select ‘Equals’ in the Operator drop-down box.
9. Enter Seattle as the Value. You should see the following text in the Expression box: user.city -eq “Seattle”
10. Click Save to create the group. -
SIMULATION
Please wait while the virtual machine loads. Once loaded, you may proceed to the lab section. This may take a few minutes, and the wait time will not be deducted from your overall test time.
When the Next button is available, click it to access the lab section. In this section, you will perform a set of tasks in a live environment. While most functionality will be available to you as it would be in a live environment, some functionality (e.g., copy and paste, ability to navigate to external websites) will not be possible by design.
Scoring is based on the outcome of performing the tasks stated in the lab. In other words, it doesn’t matter how you accomplish the task, if you successfully perform it, you will earn credit for that task.
Labs are not timed separately, and this exam may have more than one lab that you must complete. You can use as much time as you would like to complete each lab. But, you should manage your time appropriately to ensure that you are able to complete the lab(s) and all other sections of the exam in the time provided.
Please note that once you submit your work by clicking the Next button within a lab, you will NOT be able to return to the lab.
You may now click next to proceed to the lab.
Lab information
Use the following login credentials as needed:
To enter your username, place your cursor in the Sign in box and click on the username below.
To enter your password, place your cursor in the Enter password box and click on the password below.
Microsoft 365 Username:
admin@LODSe426243.onmicrosoft.comMicrosoft 365 Password: 3&YWyjse-6-d
If the Microsoft 365 portal does not load successfully in the browser, press CTRL-K to reload the portal in a new browser tab.
The following information is for technical support purposes only:
Lab Instance: 10887751
A user named Johanna Lorenz recently left the company. A new employee named Ben Smith will handle the tasks of Johanna Lorenz.
You need to create a user named Ben Smith. Ben Smith must be able to sign in to http://myapps.microsoft.com and open Microsoft Word Online.
- See explanation below.
Explanation:You need to create a user account and assign a license to the account. You then
To create the user account and mailbox:
1. In the Microsoft 365 admin center, go to User management, and select Add user.
2. Enter the name Ben Smith in the First Name and Last Name fields.
3. Enter Ben.Smith in the username field and click Next.
4. Assign a Microsoft 365 license to the account.
5. Click Next.
6. Click Next again.
7. Click ‘Finish adding’. -
SIMULATION
Please wait while the virtual machine loads. Once loaded, you may proceed to the lab section. This may take a few minutes, and the wait time will not be deducted from your overall test time.
When the Next button is available, click it to access the lab section. In this section, you will perform a set of tasks in a live environment. While most functionality will be available to you as it would be in a live environment, some functionality (e.g., copy and paste, ability to navigate to external websites) will not be possible by design.
Scoring is based on the outcome of performing the tasks stated in the lab. In other words, it doesn’t matter how you accomplish the task, if you successfully perform it, you will earn credit for that task.
Labs are not timed separately, and this exam may have more than one lab that you must complete. You can use as much time as you would like to complete each lab. But, you should manage your time appropriately to ensure that you are able to complete the lab(s) and all other sections of the exam in the time provided.
Please note that once you submit your work by clicking the Next button within a lab, you will NOT be able to return to the lab.
You may now click next to proceed to the lab.
Lab information
Use the following login credentials as needed:
To enter your username, place your cursor in the Sign in box and click on the username below.
To enter your password, place your cursor in the Enter password box and click on the password below.
Microsoft 365 Username:
admin@LODSe426243.onmicrosoft.comMicrosoft 365 Password: 3&YWyjse-6-d
If the Microsoft 365 portal does not load successfully in the browser, press CTRL-K to reload the portal in a new browser tab.
The following information is for technical support purposes only:
Lab Instance: 10887751
You hire a new Microsoft 365 administrator named Nestor Wilke. Nestor Wilke will begin working for your organization in several days.
You need to ensure that Nestor Wilke is prevented from using his account until he begins working.
- See explanation below.
Explanation:You need to sign-in status for the account to ‘Blocked’. Blocking doesn’t stop the account from receiving email and it doesn’t delete any data.
1. On the home page of the Microsoft 365 admin center, type the user’s name into the Search box.
2. Select the Nestor Wilke account in the search results.
3. In the ‘Sign-in status’ section of the account properties, click the Edit link.
4. Select ‘Block the user from signing in’ and click the Save button. -
SIMULATION
Please wait while the virtual machine loads. Once loaded, you may proceed to the lab section. This may take a few minutes, and the wait time will not be deducted from your overall test time.
When the Next button is available, click it to access the lab section. In this section, you will perform a set of tasks in a live environment. While most functionality will be available to you as it would be in a live environment, some functionality (e.g., copy and paste, ability to navigate to external websites) will not be possible by design.
Scoring is based on the outcome of performing the tasks stated in the lab. In other words, it doesn’t matter how you accomplish the task, if you successfully perform it, you will earn credit for that task.
Labs are not timed separately, and this exam may have more than one lab that you must complete. You can use as much time as you would like to complete each lab. But, you should manage your time appropriately to ensure that you are able to complete the lab(s) and all other sections of the exam in the time provided.
Please note that once you submit your work by clicking the Next button within a lab, you will NOT be able to return to the lab.
You may now click next to proceed to the lab.
Lab information
Use the following login credentials as needed:
To enter your username, place your cursor in the Sign in box and click on the username below.
To enter your password, place your cursor in the Enter password box and click on the password below.
Microsoft 365 Username:
admin@LODSe426243.onmicrosoft.comMicrosoft 365 Password: 3&YWyjse-6-d
If the Microsoft 365 portal does not load successfully in the browser, press CTRL-K to reload the portal in a new browser tab.
The following information is for technical support purposes only:
Lab Instance: 10887751
You need to create a group named Group2. Users who are added to Group2 must be licensed automatically for Microsoft Offline 365.
- See explanation below.
Explanation:You need to create the group and assign a license to the group. Anyone who is added to the group will automatically be assigned the license that is assigned to the group.
1. Go to the Azure Active Directory admin center.
2. Select the Azure Active Directory link then select Groups.
3. Click the New Group link.
4. Select ‘Security’ as the group type and enter ‘Group2’ for the group name.
5. Click the Create button to create the group.
6. Back in the Groups list, select Group2 to open the properties page for the group.
7. Select ‘Licenses’.
8. Select the ‘+ Assignments’ link.
9. Tick the box to select the license.
10. Click the Save button to save the changes. -
SIMULATION
Please wait while the virtual machine loads. Once loaded, you may proceed to the lab section. This may take a few minutes, and the wait time will not be deducted from your overall test time.
When the Next button is available, click it to access the lab section. In this section, you will perform a set of tasks in a live environment. While most functionality will be available to you as it would be in a live environment, some functionality (e.g., copy and paste, ability to navigate to external websites) will not be possible by design.
Scoring is based on the outcome of performing the tasks stated in the lab. In other words, it doesn’t matter how you accomplish the task, if you successfully perform it, you will earn credit for that task.
Labs are not timed separately, and this exam may have more than one lab that you must complete. You can use as much time as you would like to complete each lab. But, you should manage your time appropriately to ensure that you are able to complete the lab(s) and all other sections of the exam in the time provided.
Please note that once you submit your work by clicking the Next button within a lab, you will NOT be able to return to the lab.
You may now click next to proceed to the lab.
Lab information
Use the following login credentials as needed:
To enter your username, place your cursor in the Sign in box and click on the username below.
To enter your password, place your cursor in the Enter password box and click on the password below.
Microsoft 365 Username:
admin@LODSe426243.onmicrosoft.comMicrosoft 365 Password: 3&YWyjse-6-d
If the Microsoft 365 portal does not load successfully in the browser, press CTRL-K to reload the portal in a new browser tab.
The following information is for technical support purposes only:
Lab Instance: 10887751
You have a user named Grady Archie. The solution must meet the following requirements:
– Grady Archie must be able to add payment methods to your Microsoft Office 365 tenant.
– The solution must minimize the number of licenses assigned to users.
– The solution must use the principle of least privilege.- See explanation below.
Explanation:You need to assign the ‘Billing Administrator’ role to Grady Archie.
1. Go to the Azure Active Directory admin center.
2. Select Users.
3. Select the Grady Archie account to open the account properties page.
4. Select ‘Assigned roles’.
5. Click the ‘Add Assignments’ button.
6. Select Billing Administrator then click the Add button. -
SIMULATION
Please wait while the virtual machine loads. Once loaded, you may proceed to the lab section. This may take a few minutes, and the wait time will not be deducted from your overall test time.
When the Next button is available, click it to access the lab section. In this section, you will perform a set of tasks in a live environment. While most functionality will be available to you as it would be in a live environment, some functionality (e.g., copy and paste, ability to navigate to external websites) will not be possible by design.
Scoring is based on the outcome of performing the tasks stated in the lab. In other words, it doesn’t matter how you accomplish the task, if you successfully perform it, you will earn credit for that task.
Labs are not timed separately, and this exam may have more than one lab that you must complete. You can use as much time as you would like to complete each lab. But, you should manage your time appropriately to ensure that you are able to complete the lab(s) and all other sections of the exam in the time provided.
Please note that once you submit your work by clicking the Next button within a lab, you will NOT be able to return to the lab.
You may now click next to proceed to the lab.
Lab information
Use the following login credentials as needed:
To enter your username, place your cursor in the Sign in box and click on the username below.
To enter your password, place your cursor in the Enter password box and click on the password below.
Microsoft 365 Username:
admin@M365x981607.onmicrosoft.comMicrosoft 365 Password: *yfLo7Ir2&y-
If the Microsoft 365 portal does not load successfully in the browser, press CTRL-K to reload the portal in a new browser tab.
The following information is for technical support purposes only:
Lab Instance: 10811525
Your organization plans to open an office in New York, and then to add 100 users to the office. The city attribute for all new users will be New York.
You need to ensure that all the new users in the New York office are licensed for Microsoft Office 365 automatically.
- See explanation below.
Explanation:You need create a dynamic group based on the city attribute. You then need to assign a license to the group. User accounts with the city attribute set to ‘New York will automatically be added to the group. Anyone who is added to the group will automatically be assigned the license that is assigned to the group.
1. Go to the Azure Active Directory admin center.
2. Select Azure Active Directory then select Groups.
3. Click on the New Group link.
4. Give the group a name such as New York Users.
5. Select Users as the membership type.
6. Select ‘Add dynamic query’.
7. Select ‘City’ in the Property drop-down box.
8. Select ‘Equals’ in the Operator drop-down box.
9. Enter ‘New York’ as the Value. You should see the following text in the Expression box: user.city -eq “New York”
10. Click Save to create the group.
11. In the Groups list, select the new group to open the properties page for the group.
12. Select ‘Licenses’.
13. Select the ‘+ Assignments’ link.
14. Tick the box to select the license.
15. Click the Save button to save the changes. -
SIMULATION
Please wait while the virtual machine loads. Once loaded, you may proceed to the lab section. This may take a few minutes, and the wait time will not be deducted from your overall test time.
When the Next button is available, click it to access the lab section. In this section, you will perform a set of tasks in a live environment. While most functionality will be available to you as it would be in a live environment, some functionality (e.g., copy and paste, ability to navigate to external websites) will not be possible by design.
Scoring is based on the outcome of performing the tasks stated in the lab. In other words, it doesn’t matter how you accomplish the task, if you successfully perform it, you will earn credit for that task.
Labs are not timed separately, and this exam may have more than one lab that you must complete. You can use as much time as you would like to complete each lab. But, you should manage your time appropriately to ensure that you are able to complete the lab(s) and all other sections of the exam in the time provided.
Please note that once you submit your work by clicking the Next button within a lab, you will NOT be able to return to the lab.
You may now click next to proceed to the lab.
Lab information
Use the following login credentials as needed:
To enter your username, place your cursor in the Sign in box and click on the username below.
To enter your password, place your cursor in the Enter password box and click on the password below.
Microsoft 365 Username:
admin@M365x981607.onmicrosoft.comMicrosoft 365 Password: *yfLo7Ir2&y-
If the Microsoft 365 portal does not load successfully in the browser, press CTRL-K to reload the portal in a new browser tab.
The following information is for technical support purposes only:
Lab Instance: 10811525
Alex Wilber must be able to reset the password of each user in your organization. The solution must prevent Alex Wilber from modifying the password of global administrators.
- See explanation below.
Explanation:You need to assign the ‘Password Administrator’ role to Alex Wilber. A user assigned the Password Administrator role can reset passwords for non-administrators and Password administrators.
1. Go to the Azure Active Directory admin center.
2. Select Users.
3. Select the Alex Wilber account to open the account properties page.
4. Select ‘Assigned roles’.
5. Click the ‘Add Assignments’ button.
6. Select Password Administrator then click the Add button. -
SIMULATION
Please wait while the virtual machine loads. Once loaded, you may proceed to the lab section. This may take a few minutes, and the wait time will not be deducted from your overall test time.
When the Next button is available, click it to access the lab section. In this section, you will perform a set of tasks in a live environment. While most functionality will be available to you as it would be in a live environment, some functionality (e.g., copy and paste, ability to navigate to external websites) will not be possible by design.
Scoring is based on the outcome of performing the tasks stated in the lab. In other words, it doesn’t matter how you accomplish the task, if you successfully perform it, you will earn credit for that task.
Labs are not timed separately, and this exam may have more than one lab that you must complete. You can use as much time as you would like to complete each lab. But, you should manage your time appropriately to ensure that you are able to complete the lab(s) and all other sections of the exam in the time provided.
Please note that once you submit your work by clicking the Next button within a lab, you will NOT be able to return to the lab.
You may now click next to proceed to the lab.
Lab information
Use the following login credentials as needed:
To enter your username, place your cursor in the Sign in box and click on the username below.
To enter your password, place your cursor in the Enter password box and click on the password below.
Microsoft 365 Username:
admin@M365x981607.onmicrosoft.comMicrosoft 365 Password: *yfLo7Ir2&y-
If the Microsoft 365 portal does not load successfully in the browser, press CTRL-K to reload the portal in a new browser tab.
The following information is for technical support purposes only:
Lab Instance: 10811525
You plan to migrate data from an on-premises email system to your Microsoft 365 tenant.
You need to ensure that Debra Berger can import a PST file.
- See explanation below.
Explanation:Debra will need the Mailbox Import Export and Mail Recipients roles to be able to import PST files. These roles cannot be assigned directly to a user account. The way to assign just those two roles to a user is to create a new role group, assign the roles to the role group and add the user as a member.
1. Go to the Exchange admin center.
2. Select Permissions.
3. In the Admin roles section, click the plus (+) sign to create a new role.
4. Give the role group a name such as PST Import.
5. In the roles section, click the plus (+) sign.
6. Select the Mailbox Import Export and Mail Recipients roles and click Add to add the roles.
7. In the Members section, click the plus (+) sign.
8. Select Debra Berger then click Add then Ok to add Debra as a member of the new role group.
9. Click the Save button to save the new role group. -
HOTSPOT
Your company has a Microsoft Azure Active Directory (Azure AD) tenant named contoso.onmicrosoft.com that contains the users shown in the following table.

MS-100 Microsoft 365 Identity and Services Part 09 Q16 107 You need to identify which users can perform the following administrative tasks:
– Reset the password of User4.
– Modify the value for the manager attribute of User4.Which users should you identify for each task? To answer, select the appropriate options in the answer area.
NOTE: Each correct selection is worth one point.

MS-100 Microsoft 365 Identity and Services Part 09 Q16 108 Question 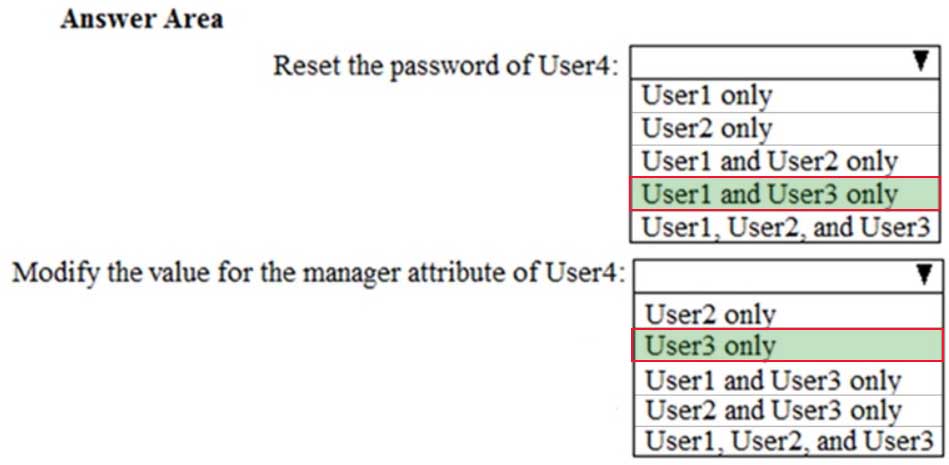
MS-100 Microsoft 365 Identity and Services Part 09 Q16 108 Answer Explanation:Box 1:
A Password Administrator or a User Administrator can reset the password non-administrative users.Box 2: A User Administrator can configure other attributes such as the Manager attribute of non-administrative users.
-
HOTSPOT
Your company has offices in several cities and 100,000 users.
The network contains an Active Directory domain named contoso.com.
You purchase Microsoft 365 and plan to deploy several Microsoft 365 services.
You are evaluating the implementation of pass-through authentication and seamless SSO. Azure AD Connect will NOT be in staging mode.
You need to identify the redundancy limits for the planned implementation.
What should you identify? To answer, select the appropriate options in the answer area.
NOTE: Each correct selection is worth one point.

MS-100 Microsoft 365 Identity and Services Part 09 Q17 109 Question 
MS-100 Microsoft 365 Identity and Services Part 09 Q17 109 Answer Explanation:Azure AD Connect can be active on only one server. You can install Azure AD Connect on another server for redundancy but the additional installation would need to be in Staging mode. An Azure AD connect installation in Staging mode is configured and ready to go but it needs to be manually switched to Active to perform directory synchronization.
Azure authentication agents can be installed on as many servers as you like. -
Note: This question is part of a series of questions that present the same scenario. Each question in the series contains a unique solution that might meet the stated goals. Some question sets might have more than one correct solution, while others might not have a correct solution.
After you answer a question in this section, you will NOT be able to return to it. As a result, these questions will not appear in the review screen.
Your network contains an on-premises Active Directory forest named contoso.com. The forest contains the following domains:
– Contoso.com
– East.contoso.comAn Azure AD Connect server is deployed to contoso.com. Azure AD Connect syncs to an Azure Active Directory (Azure AD) tenant.
You deploy a new domain named west.contoso.com to the forest.
You need to ensure that west.contoso.com syncs to the Azure AD tenant.
Solution: You create an Azure DNS zone for west.contoso.com. On the on-premises DNS servers, you create a conditional forwarder for west.contoso.com.
Does this meet the goal?
- Yes
- No
-
HOTSPOT
Your company has a Microsoft Azure Active Directory (Azure AD) tenant that contains the users shown in the following table.

MS-100 Microsoft 365 Identity and Services Part 09 Q19 110 The tenant includes a security group named Admin1. Admin1 will be used to manage administrative accounts. External collaboration settings have default configuration.
You need to identify which users can perform the following administrative tasks:
Create guest user accounts
Add User3 to Admin1Which users should you identify for each task? To answer, select the appropriate options in the answer area.
NOTE: Each correct selection is worth one point.

MS-100 Microsoft 365 Identity and Services Part 09 Q19 111 Question 
MS-100 Microsoft 365 Identity and Services Part 09 Q19 111 Answer Explanation:A User Administrator is the only role listed that can create user accounts included Guest user accounts. A Global Administrator can also create user accounts.
A User Administrator is also the only role listed that can modify the group membership of users. -
You have a Microsoft 365 subscription that contains an Azure Active Directory (Azure AD) tenant named contoso.com.
Corporate policy states that user passwords must not include the word Contoso.
What should you do to implement the corporate policy?
- From the Azure Active Directory admin center, configure the Password protection settings.
- From the Microsoft 365 admin center, configure the Password policy settings.
- From Azure AD Identity Protection, configure a sign-in risk policy.
- From the Azure Active Directory admin center, create a conditional access policy.
Explanation:
The Password protection settings allows you to specify a banned password list of phrases that users cannot use as part of their passwords.