MS-500 : Microsoft 365 Security Administration : Part 04
-
SIMULATION
You need to ensure that all links to malware.contoso.com within documents stored in Microsoft Office 365 are blocked when the documents are accessed from Office 365 ProPlus applications.
To complete this task, sign in to the Microsoft 365 admin center.
- See explanation below.
Explanation:1. After signing in to the Microsoft 365 admin center, navigate to Threat management, choose Policy > Safe Links.
2. In the Policies that apply to the entire organization section, select Default, and then choose Edit (the Edit button resembles a pencil).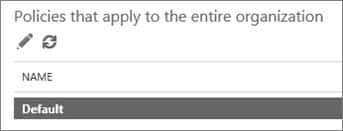
MS-500 Microsoft 365 Security Administration Part 04 Q01 089 3. In the Block the following URLs section, add the malware.contoso.com link.
4. In the Settings that apply to content except email section, select all the options.
5. Choose Save. -
SIMULATION
You need to protect against phishing attacks. The solution must meet the following requirements:
– Phishing email messages must be quarantined if the messages are sent from a spoofed domain.
– As many phishing email messages as possible must be identified.The solution must apply to the current SMTP domain names and any domain names added later.
To complete this task, sign in to the Microsoft 365 admin center.
- See explanation below.
Explanation:1. After signing in to the Microsoft 365 admin center, select Security, Threat Management, Policy, then ATP Anti-phishing.
2. Select Default Policy to refine it.
3. In the Impersonation section, select Edit.
4. Go to Add domains to protect and select the toggle to automatically include the domains you own.
5. Go to Actions, open the drop-down If email is sent by an impersonated user, and choose the Quarantine message action.
Open the drop-down If email is sent by an impersonated domain and choose the Quarantine message action.
6. Select Turn on impersonation safety tips. Choose whether tips should be provided to users when the system detects impersonated users, domains, or unusual characters. Select Save.
7. Select Mailbox intelligence and verify that it’s turned on. This allows your email to be more efficient by learning usage patterns.
8. Choose Add trusted senders and domains. Here you can add email addresses or domains that shouldn’t be classified as an impersonation.
9. Choose Review your settings, make sure everything is correct, select Save, then Close. -
Your network contains an on-premises Active Directory domain. The domain contains the servers shown in the following table.

MS-500 Microsoft 365 Security Administration Part 04 Q03 090 You plan to implement Azure Advanced Threat Protection (ATP) for the domain.
You install an Azure ATP standalone sensor on Server1.
You need to monitor the domain by using Azure ATP.
What should you do?
- Configure port mirroring for Server1.
- Install the Microsoft Monitoring Agent on DC1.
- Install the Microsoft Monitoring Agent on Server1.
- Configure port mirroring for DC1.
-
An administrator plans to deploy several Azure Advanced Threat Protection (ATP) sensors.
You need to provide the administrator with the Azure information required to deploy the sensors.
What information should you provide?
- an Azure Active Directory Authentication Library (ADAL) token
- the public key
- the access key
- the URL of the Azure ATP admin center
-
SIMULATION
Please wait while the virtual machine loads. Once loaded, you may proceed to the lab section. This may take a few minutes, and the wait time will not be deducted from your overall test time.
When the Next button is available, click it to access the lab section. In this section, you will perform a set of tasks in a live environment. While most functionality will be available to you as it would be in a live environment, some functionality (e.g., copy and paste, ability to navigate to external websites) will not be possible by design.
Scoring is based on the outcome of performing the tasks stated in the lab. In other words, it doesn’t matter how you accomplish the task, if you successfully perform it, you will earn credit for that task.
Labs are not timed separately, and this exam may more than one lab that you must complete. You can use as much time as you would like to complete each lab. But, you should manage your time appropriately to ensure that you are able to complete the lab(s) and all other sections of the exam in the time provided.
Please note that once you submit your work by clicking the Next button within a lab, you will NOT be able to return to the lab.
Username and password
MS-500 Microsoft 365 Security Administration Part 04 Q05 091 Use the following login credentials as needed:
To enter your username, place your cursor in the Sign in box and click on the username below.
To enter your password, place your cursor in the Enter password box and click on the password below.
Microsoft 365 Username:
[email protected]Microsoft 365 Password: &=Q8v@2qGzYz
If the Microsoft 365 portal does not load successfully in the browser, press CTRL-K to reload the portal in a new browser tab.
The following information is for technical support purposes only:
Lab instance: 11032396
You need to ensure that a user named Alex Wilber can register for multifactor authentication (MFA).
To complete this task, sign in to the Microsoft Office 365 admin center.
- See explanation below.
Explanation:Enable Modern authentication for your organization
1. To enable modern authentication, from the admin center, select Settings > Settings and then in the Services tab, choose Modern authentication from the list.
2. Check the Enable modern authentication box in the Modern authentication panel.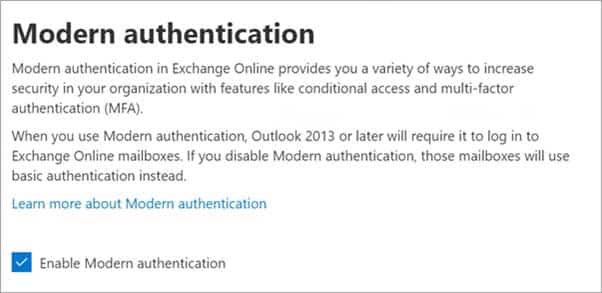
MS-500 Microsoft 365 Security Administration Part 04 Q05 092 Enable multi-factor authentication for your organization
1. In the admin center, select Users and Active Users.
2. In the Active Users section, Click on multi-factor authentication.
3. On the Multi-factor authentication page, select user if you are enabling this for one user or select Bulk Update to enable multiple users.
4. Click on Enable under Quick Steps.
5. In the Pop-up window, Click on Enable Multi-Factor Authentication.
After you set up multi-factor authentication for your organization, your users will be required to set up two-step verification on their devices. -
HOTSPOT
You have a Microsoft 365 subscription that uses a default domain name of contoso.com.
Microsoft Azure Active Directory (Azure AD) contains the users shown in the following table.

MS-500 Microsoft 365 Security Administration Part 04 Q06 093 Microsoft Endpoint Manager has two devices enrolled as shown in the following table:

MS-500 Microsoft 365 Security Administration Part 04 Q06 094 Both devices have three apps named App1, App2, and App3 installed.
You create an app protection policy named ProtectionPolicy1 that has the following settings:
– Protected apps: App1
– Exempt apps: App2
– Windows Information Protection mode: BlockYou apply ProtectionPolicy1 to Group1 and Group3. You exclude Group2 from ProtectionPolicy1.
For each of the following statements, select Yes if the statement is true. Otherwise, select No.
NOTE: Each correct selection is worth one point.

MS-500 Microsoft 365 Security Administration Part 04 Q06 095 Question 
MS-500 Microsoft 365 Security Administration Part 04 Q06 095 Answer -
You have a Microsoft 365 tenant.
You have 500 computers that run Windows 10.
You plan to monitor the computers by using Microsoft Defender for Endpoint after the computers are enrolled in Microsoft Endpoint Manager.
You need to ensure that the computers connect to Microsoft Defender for Endpoint.
How should you prepare Endpoint Manager for Microsoft Defender for Endpoint?
- Configure an enrollment restriction
- Create a device configuration profile
- Create a conditional access policy
- Create a Windows Autopilot deployment profile
-
HOTSPOT
Your company has a Microsoft 365 subscription that contains the users shown in the following table.

MS-500 Microsoft 365 Security Administration Part 04 Q08 096 The company implements Microsoft Defender Advanced Threat Protection (Microsoft Defender ATP). Microsoft Defender ATP includes the roles shown in the following table:
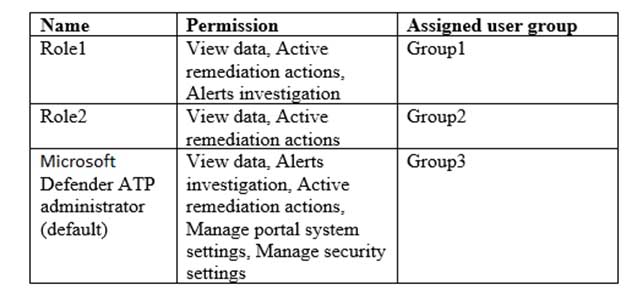
MS-500 Microsoft 365 Security Administration Part 04 Q08 097 Microsoft Defender ATP contains the machine groups shown in the following table:

MS-500 Microsoft 365 Security Administration Part 04 Q08 098 For each of the following statements, select Yes if the statement is true. Otherwise, select No.
NOTE: Each correct selection is worth one point.

MS-500 Microsoft 365 Security Administration Part 04 Q08 099 Question 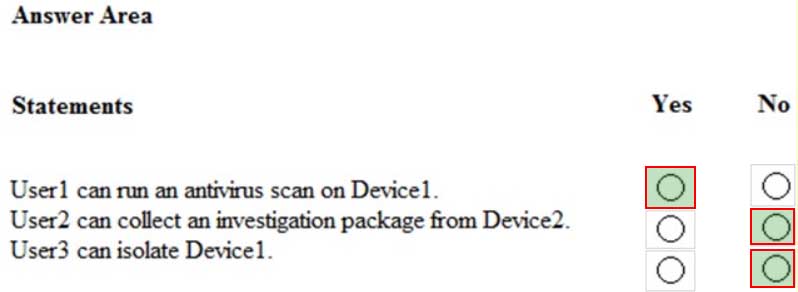
MS-500 Microsoft 365 Security Administration Part 04 Q08 099 Answer -
You have a hybrid deployment of Microsoft 365 that contains the users shown in the following table.

MS-500 Microsoft 365 Security Administration Part 04 Q09 100 You plan to use Microsoft 365 Attack Simulator.
You need to identify the users against which you can use Attack Simulator.
Which users should you identify?
- User3 only
- User1, User2, User3, and User4
- User3 and User4 only
- User1 and User3 only
- Add Code Pre
Explanation:
Each targeted recipient must have an Exchange Online mailbox. -
SIMULATION
You need to implement a solution to manage when users select links in documents or email messages from Microsoft Office 365 ProPlus applications or Android devices. The solution must meet the following requirements:
– Block access to a domain named fabrikam.com
– Store information when the users select links to fabrikam.comTo complete this task, sign in to the Microsoft 365 portal.
- See explanation below.
Explanation:
You need to configure a Safe Links policy.
1. Go to the Office 365 Security & Compliance admin center.
2. Navigate to Threat Management > Policy > Safe Links.
3. In the Policies that apply to the entire organization section, select Default, and then click the Edit icon.
4. In the Block the following URLs section, type in *.fabrikam.com. This meets the first requirement in the question.
5. In the Settings that apply to content except email section, untick the checkbox labelled Do not track when users click safe links. This meets the second requirement in the question.
6. Click Save to save the changes. -
SIMULATION
You need to configure your organization to automatically quarantine all phishing email messages.
To complete this task, sign in to the Microsoft 365 portal.
- See explanation below.
Explanation:
You need to edit the Anti-Phishing policy.
1. Go to the Office 365 Security & Compliance admin center.
2. Navigate to Threat Management > Policy > ATP Anti-Phishing.
3. Click on Default Policy.
4. In the Impersonation section, click Edit.
5. Go to the Actions section.
6. In the If email is sent by an impersonated user: box, select Quarantine the message from the drop-down list.
7. In the If email is sent by an impersonated domain: box, select Quarantine the message from the drop-down list.
8. Click Save to save the changes.
9. Click Close to close the anti-phishing policy window. -
You configure several Advanced Threat Protection (ATP) policies in a Microsoft 365 subscription.
You need to allow a user named User1 to view ATP reports in the Threat management dashboard.
Which role provides User1 with the required role permissions?
- Security administrators
- Exchange administrator
- Compliance administrator
- Message center reader
-
You have a Microsoft 365 subscription and a Microsoft Defender Advanced Threat Protection (Microsoft Defender ATP) subscription.
You have devices enrolled in Microsoft Endpoint Manager as shown in the following table:
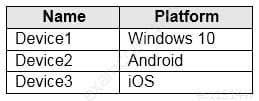
MS-500 Microsoft 365 Security Administration Part 04 Q13 101 You integrate Microsoft Defender ATP and Endpoint Manager.
You plan to evaluate the Microsoft Defender ATP risk level for the devices.
You need to identify which devices can be evaluated.
Which devices should you identify?
- Device1 and Device2 only
- Device1 only
- Device1 and Device3 only
- Device1, Device2 and Device3
Explanation:
Microsoft Defender ATP (now known as Microsoft Defender for Endpoint) now supports Windows 7 SP1 and above, Windows Server 2008 SP1 and above, the three most recent major releases of macOS, iOS 11.0 and above, Android 6.0 and above and Red Hat Enterprise Linux 7.2 or higher, CentOS 7.2 or higher, Ubuntu 16.04 LTS or higher LTS, Debian 9 or higher, SUSE Linux Enterprise Server 12 or higher, and Oracle Linux 7.2 or higher. -
HOTSPOT
You have a Microsoft 365 E5 subscription that contains an Azure Active Directory (Azure AD) tenant named contoso.com.
Azure AD Identity Protection alerts for contoso.com are configured as shown in the following exhibit.
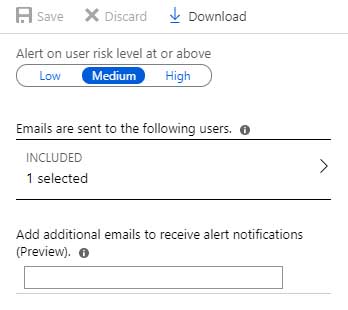
MS-500 Microsoft 365 Security Administration Part 04 Q14 102 A user named User1 is configured to receive alerts from Azure AD Identity Protection.
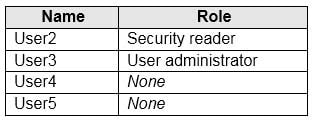
You create users in contoso.com as shown in the following table.
MS-500 Microsoft 365 Security Administration Part 04 Q14 103 The users perform the sign-ins shown in the following table.

MS-500 Microsoft 365 Security Administration Part 04 Q14 104 For each of the following statements, select Yes if the statement is true. Otherwise, select No.
NOTE: Each correct selection is worth one point.
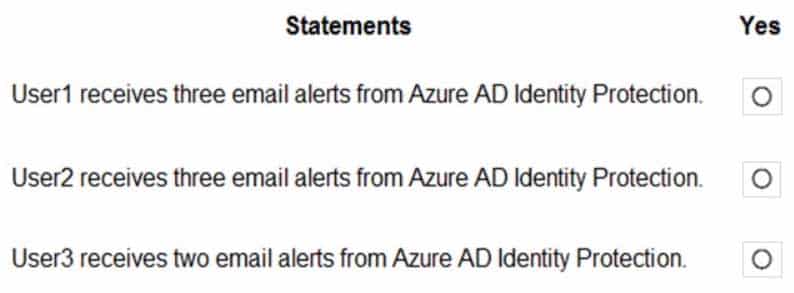
MS-500 Microsoft 365 Security Administration Part 04 Q14 105 Question 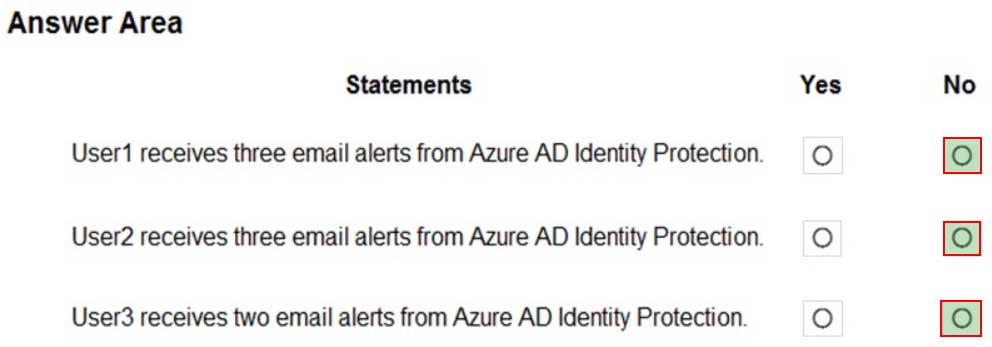
MS-500 Microsoft 365 Security Administration Part 04 Q14 105 Answer Explanation:Box 1: No
User1 will receive the two alerts classified as medium or higher.
Sign-ins from infected device is classified as low. This risk detection identifies IP addresses, not user devices. If several devices are behind a single IP address, and only some are controlled by a bot network, sign-ins from other devices my trigger this event unnecessarily, which is why this risk detection is classified as Low.Box 2: No
User2 will receive the two alerts classified as medium or higher.
Email alerts are sent to all global admins, security admins and security readers
Sign-ins from infected device is classified as low. This risk detection identifies IP addresses, not user devices. If several devices are behind a single IP address, and only some are controlled by a bot network, sign-ins from other devices my trigger this event unnecessarily, which is why this risk detection is classified as Low.Box 3: No
User3 will not receive alters.
Email alerts are sent to all global admins, security admins and security readers. -
You have an Azure Sentinel workspace that has an Azure Active Directory (Azure AD) connector and a Microsoft Office 365 connector.
You need to assign built-in role-based access control (RBAC) roles to achieve the following tasks:
– Create and run playbooks.
– Manage incidents.The solution must use the principle of least privilege.
Which two roles should you assign? Each correct answer presents part of the solution.
NOTE: Each correct selection is worth one point.
- Automation Operator
- Azure Sentinel responder
- Automation Runbook Operator
- Azure Sentinel contributor
- Logic App contributor
-
Your company uses Microsoft Azure Advanced Threat Protection (ATP).
You enable the delayed deployment of updates for an Azure ATP sensor named Sensor1.
How long after the Azure ATP cloud service is updated will Sensor1 be updated?
- 7 days
- 24 hours
- 1 hour
- 48 hours
- 12 hours
Explanation:
Note: The delay period was 24 hours. In ATP release 2.62, the 24 hour delay period has been increased to 72 hours. -
DRAG DROP
You have a Microsoft 365 E5 subscription. All users use Microsoft Exchange Online.
Microsoft 365 is configured to use the default policy settings without any custom rules.
You manage message hygiene.
Where are suspicious email messages placed by default? To answer, drag the appropriate location to the correct message types. Each option may be used once, more than once, or not at all. You may need to drag the split bar between panes or scroll to view content.

MS-500 Microsoft 365 Security Administration Part 04 Q17 106 Question 
MS-500 Microsoft 365 Security Administration Part 04 Q17 106 Answer -
You have a Microsoft 365 subscription.
You create a Microsoft Defender for Office 365 safe attachments policy.
You need to configure the retention duration for the attachments in quarantine.
Which type of threat management policy should you create?
- Anti-phishing
- DKIM
- Anti-spam
- Anti-malware
-
Your company has 500 computers.
You plan to protect the computers by using Microsoft Defender for Endpoint. Twenty of the computers belong to company executives.
You need to recommend a remediation solution that meets the following requirements:
– Microsoft Defender for Endpoint administrators must manually approve all remediation for the executives
– Remediation must occur automatically for all other usersWhat should you recommend doing from Microsoft Defender Security Center?
- Configure 20 system exclusions on automation allowed/block lists
- Configure two alert notification rules
- Download an offboarding package for the computers of the 20 executives
- Create two machine groups
-
You have a Microsoft 365 Enterprise E5 subscription.
You use Microsoft Defender for Endpoint.
You need to integrate Microsoft Defender for Office 365 and Microsoft Defender for Endpoint.
Where should you configure the integration?
- From the Microsoft 365 admin center, select Settings, and then select Services & add-ins.
- From the Microsoft 365 security admin center, select Threat management, and then select Explorer.
- From the Microsoft 365 admin center, select Reports, and then select Security & Compliance.
- From the Microsoft 365 security admin center, select Threat management and then select Threat tracker.