11.2.3.5 Lab – Configure Browser Settings Answers Full 100% 2023 2024
This is Cisco 11.2.3.5 Lab – Configure Browser Settings Answers Full 100% 2023 2024 for Cisco ITE v8, IT Essentials 7.02, and ITE 8.01.
Lab – Configure Browser Settings (Answers Version)
Answers Note: Red font color or gray highlights indicate text that appears in the Answers copy only.
Introduction
In this lab, you will configure browser settings in Microsoft Internet Explorer.
Recommended Equipment
- A computer with Windows and Microsoft Internet Explorer installed
- An internet connection
Answers Note: This lab contains configuration examples from Microsoft Internet Explorer version 11. You will need to make the changes necessary if you are using a different version or browser in your classroom. If you do not allow students to access the internet directly, perform this lab as a demonstration for the class.
Instructions
Step 1: Set Internet Explorer as the default browser.
- On the Start screen, type www.netacad.com and navigate to the web page.
Question:
Which browser was used to open the web page?
Answers may vary. Internet Explorer, Internet Edge or other browser.
If your answer is not Internet Explorer, use the following steps to set Internet Explorer as your default browser. Otherwise, go to step b.
1) Navigate to the Control Panel in small icons view. Select Internet Options.
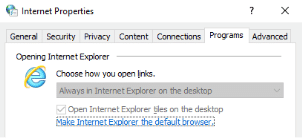
2) In the Internet Properties window, select the Programs tab, and click Make Internet Explorer the default browser. (In Windows 7, click Make default.)

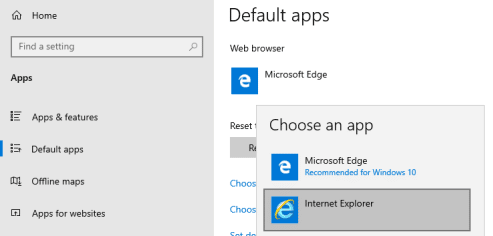
3) In the Default apps window in Windows 10, scroll down to the Web browser heading. Click the current default web browser and select Internet Explorer to be the default web browser. Click Switch anyway and close the Default apps to continue.

In Windows 8.1 in Set Default Programs window, click Internet Explorer in the left panel to be the default browser. Click Set this program as default. Click OK to close the Set Default Programs.
4) Click OK in the Internet Options window to continue.
- Open Internet Explorer. Click Tools icon (gear shape) > About Internet Explorer or click Help icon (?) > About Internet Explorer.
Question:
Which version of Internet Explorer is installed on your computer?
Answers may vary.
- Click Close or OK to continue.
Step 2: Clear Temporary Internet Files.
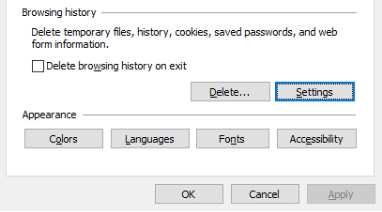
- Within Internet Explorer, select Tools (gear icon) > Internet options. Click Settings in the Browsing history section in the General tab.

- For Windows 10 and 8.1, in the Temporary Internet Files tab of the Website Data Settings window, click View files to list the temporary Internet files.
For Windows 7, in the Temporary Internet Files and History Settings window, click View files to list the temporary internet files.
Question:
How many temporary internet files are listed?
Answers may vary.
- Close the INetCache or Temporary Internet Files window.
Questions:
In the Temporary Internet Files tab of the Website Data Settings window in Windows 10 and 8.1 or Temporary Internet Files and History Settings window in Windows 7, which setting is configured for Check for newer versions of stored pages?
Answers may vary. Automatically
In the History tab in Windows 10 and 8.1 and under the History heading, how many days is History set to store list of visited websites?
Answers may vary. 20
- Click OK to close the Website Data Settings or Temporary Internet Files and History Settings.
- In the General tab of the Internet Options window, click Delete to remove temporary files, history, cookies, saved passwords, and web form information.
Question:
Which options are available in the Delete Browsing History for deleting browsing history?
Answer varies depends on Windows version: Preserve Favorites website data, Temporary internet files and website files, Cookies and website data, History, Download History, Form data, Passwords, InPrivate Filtering data, and Tracking Protection, ActiveX Filtering and Do Not Track.
- Uncheck all selected options except for Temporary Internet files. Click Delete to remove the temporary files. When completed, Internet Explorer displays the message Internet Explorer has finished deleting the selected browsing history.
- Close all open windows except for Internet Explorer.
Step 3: Clear Internet Browsing History.
- Open Internet Explorer if closed and visit a few web sites using the same tab.
- Click the down arrow, at the right end of the URL Address field, to view previously visited sites.
Question:
How many sites are listed in the drop-down box?
Answers may vary.
- To clear the browser history, select Tools > Internet options > Delete. Uncheck all selected options except for History. Click Delete.
- Close all open windows except for Internet Explorer.
- When completed, click the down arrow at the right end of the address field to view previously visited sites.
- Question:
How many sites are found in the drop-down box for browsing history?
None.
Step 4: Configure the Security Settings.
- In Internet Explorer, select Tools > Internet options, and then click the Security tab.
- Click each of the four zones and describe their security settings.
Internet:
For all internet websites, except those listed in trusted and restricted zones.
Local intranet:
For all websites that are found on your intranet.
Trusted sites:
Websites that you trust not to damage your computer or your files.
Restricted sites:
Websites that might damage your computer or your files.
- Click the Custom level… button. In this window, you can select the options in the list that you wish to change for a zone. Click Cancel to close this window.
Step 5: Configure Privacy Settings.
- Open Internet Explorer if necessary. Click Tools >Internet options > Privacy tab. Click Advanced.
- In the Advanced Privacy Settings window, click Override automatic cookie handling in Windows 8.1 and 7 to override the settings. Change the setting for Third-party Cookies to Prompt. Click OK and close all open windows.
Reflection Question
- Why would you want to clear temporary internet files or internet browsing history?
Answers will vary. The amount of temporary files and browser history could take up quite a bit of space on the hard drive with data from websites that you may never visit again. This data could be a privacy concern if the computer is shared because the data can reveal the websites visited in the past.
- For Windows 10, the recommended web browser is Microsoft Edge. How would you change the default web browser to Microsoft Edge?
Click Start and search for Default apps. Scroll down to Web browser and select Microsoft Edge as the default browser.