11.3.1.11 Lab – Monitor and Manage System Resources Answers Full 100% 2023 2024
This is Cisco 11.3.1.11 Lab – Monitor and Manage System Resources Answers Full 100% 2023 2024 for Cisco ITE v8, IT Essentials 7.02, and ITE 8.01.
Lab – Monitor and Manage System Resources (Answers Version)
Answers Note: Red font color or gray highlights indicate text that appears in the Answers copy only.
Introduction
In this lab, you will use administrative tools to monitor and manage system resources.
Recommended Equipment
- A computer running Windows with Internet access
Instructions
Part 1:Event Viewer
In this part, Windows Defender is used to explore the Event Viewer when the status of a service changes. Windows Defender is the built-in anti-malware component in Windows.
Step 1:Verify Windows Defender is running.
Note: Some antivirus or antispyware programs must be uninstalled on the computer for Windows Defender to work.
- Log on to Windows as an administrator.
- To determine if Windows Defender service is stopped, click Start, search for Windows Defender.
In Windows 10, click Virus & threat protection. Scroll down to the Virus & threat protection settings. Click Manage settings. Under the Real-time protection heading, verify that it is On.
In Windows 8.1, in the Home tab, verify that the Real-time protection is On. If Windows Defender does not open, navigate to Action Center (click Start > search for Action Center. Click Turn on now for Spyware and unwanted software protection (Important) and Virus protection (Important).
In Windows 7, you will receive the message This program is turned off in the Windows Defender window. Click click here to turn it on in the window and click Close to continue.
- Keep Windows Defender open.
Step 2:Explore the Services console.
Note: While most of the Windows services can be managed through the Services console, it is not possible to stop Windows Defender from Windows Services console in Windows 10 and 8.1.
- Click Start > search for Control Panel. In the Control Panel in the Small icons view, click Administrative Tools > click Computer Management. In the Computer Management window, expand Services and Applications, and select Services.
- Scroll to the Computer Management window under the Services heading so you see the Windows Defender Antivirus Network Inspection Service (Windows 10) or Windows Defender Service (Windows 8.1) or Window Defender (Windows 7).
Question:
What is the status of the service?
In Windows 10 and 8.1: the status is Running. In Windows 7, the status is Started.
- Close the Computer Management window. Navigate back to the Windows Defender and turn it off.
In Windows 10, click Virus & threat protection. Scroll down to the Virus & threat protection settings. Click Manage settings. Under the Real-time protection heading, click the slider to turn it off. Click Yes to allow this app to make changes to the device.
In Windows 8.1, in the Settings tab, select the Settings tab. In the Settings tab, select Administrator. Click Turn on this application to turn off Windows Defender. Click Save changes to turn off Windows Defender. Click Close in the pop-up window as necessary.
In Windows 7, click Tools. Click Options. In the Options window, select Administrator > click Use this program. Click Save to stop Windows Defender. Click Close to continue when a message informing you that you have turned it off.
- Navigate back to Services. (Control Panel in Small icons view > Administrative Tools > Services). Click Action > click Refresh.
Look for Windows Defender Antivirus Network Inspection Service (Windows 10) or Windows Defender Service (Windows 8.1) or Window Defender (Windows 7). Record the Windows Defender status.
There is no status because it is turned off.
- Navigate to the Event Viewer. In the Computer Management window, expand System Tools > expand Event Viewer > expand Windows Logs > select Application (Windows 10), select System (Windows 8.1 and 7).
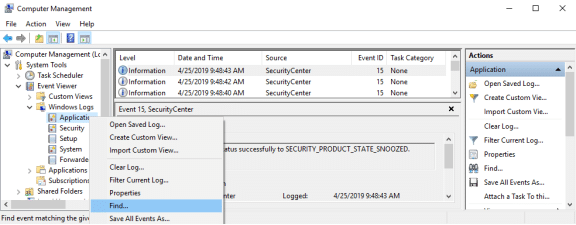
- In the Application or System pane, you can find the most recent events are related to Windows Defender. Right-click the interested log, select Find. Enter defender to search Windows Defender related entries.

In the General tab, what is listed as the Source of the event? What is the severity level?
The severity level is informational for all Windows version. In Windows 10, the source is Security Center. In Windows 8.1, the source is Service Control Manager. In Windows 7, the source is Service Control Manager.
- Navigate to Windows Defender and turn it on. Close Windows Defender.
- Navigate to the Event Viewer to review the most recent event entries that are related to Windows Defender.
Part 2:Explore the Impact of Services.
In this part, you will stop Print Spooler service to explore the impact in the system. The print spooler is responsible for managing the printer jobs and handling the interaction with the printer. With this service turned off, you will not be able to print or see your printers.
Step 1:Verify printing service
- Open Notepad. Click Start and search for Notepad.
- In Notepad, click File > Print. Record a listed printer below. Note: You do not need to install a physical printer.
Answers may vary. Microsoft XPS Document Writer is a print-to-file driver is installed by Windows.
- Click Cancel to exit the print dialog.
Step 2:Stop print spooler
- Open the Services console. (Control Panel > Administrative Tools > Services)
- Right-click Print Spooler and select Stop.
- Navigate to Notepad. Attempt to print.
Question:
What message did you receive? How would you fix this?
The message received: Before you can perform printer-related tasks such as page setup or printing a document, you need to install a printer. You will need to restart the print spooler.
- Click OK or No in the message window and click Cancel to exit the Print window.
Step 3:Restart print spooler
- Navigate to the Services console and restart the print spooler. Right-click Print Spooler and select Start.
- Verify that you can print.
Step 4:Explore DHCP Client service
The DHCP Client service registers and updates the IP addresses and DNS records for the PC. If this service is stopped, the PC will not receive a dynamic IP address and DNS updates.
- In the Services console, search for DHCP Client. Right-click DHCP Client and select Stop.
Question:
When DHCP Client stops, what other services will also be stopped?
Answer may vary. Windows 7: You may not receive any information regarding stopping other services. Windows 10 and 8.1 could include: IP Helper, WinHTTP Web Proxy Auto-Discovery Service, Network List Service, and Network Location Awareness.
- Click No in the Stop Other Services window.
Question:
Why is it important to exercise care when managing services?
Applications and other services may depend on a given service to work. Stopping a service can compromise the operation of other services.
- Verify that DHCP Client is still running.
Part 3:Monitor and record system usage with Administrative Tools
You will configure advanced Administrative Tool features and monitor the usage of system resources of the computer.
Step 1:Create a new data collector set.
- Navigate to Control Panel > click Administrative Tools > click Computer Management > Expand System Tools.
- Expand Performance > Expand Data Collector Sets > in the left pane, right-click User Defined > select New > click Data Collector Set.
- In the Create new Data Collector Set window, type Memory Logs.in the Name field. Select the Create manually (Advanced) and click Next to continue.
- In the What type of data do you want to include? window, select Performance counter and click Next.
- In the Which performance counters would you like to log? Window, click Add. From the list of available counters, locate and expand Memory. Select Available MBytes > Add and click OK to continue.
- Set the Sample interval: field to 4 seconds. Click Next to continue.
- In the Where would you like the data to be saved? Window, click Browse. Select Local Disk (C:) and select PerfLogs. Click OK to continue.
- Verify the correct root directory path is displayed (C:\PerfLogs), and click Finish to continue.
Step 2:Format the data collector set.
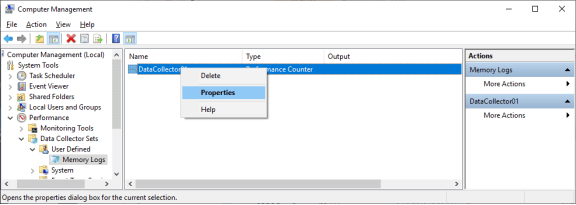
- Expand User Defined and select Memory Logs in the left pane. Right-click Data Collector01 and right-click Properties.

- In DataCollector01 Properties window, change the Log format: field to Comma Separated.
- Click the File tab.
Question:
What is the full path name to the example file name?
Answer may vary. For example: C:\PerfLogs\DataCollectionName\DataCollector01.csv
- Click OK to continue to close the Properties window.
Step 3:Collect and view the data.
- Select the Memory Logs icon in the left pane of the Computer Management window. Right-click Memory Logs and select Start.
- To force the computer to use some of the available memory, open and close a browser.
- Right-click Memory Logs and select Stop to stop the data collection set.
Navigate to Local Disk (C:)\PerfLogs. Click Continue in the Windows warning messages.
- Open the folder that was created to store the memory log. Click Continue on the Windows warning messages. Open the DataCollector01.csv file.
Select Notepad or another program that can read comma-separated files (.csv) to open the file if the Windows cannot open the file message is displayed.
Question:
What does the column farthest to the right show?
Available memory in MBytes.
- Close the DataCollector01.csv file.
Step 4:Clean up
- Navigate to the Computer Management window. Select Performance > click Data Collection Sets > click User Defined. Right-click Memory Logs and select Delete. Click Yes to confirm the deletion.
- Navigate to the Local Drive C: > PerfLogs folder. Delete the stored memory logs folder (folder with the DataCollector01.csv) created from this lab.
- Close all opened windows.